Arlen Holder
2020-09-11 23:07:10 UTC
Tutorial creating & using Hirens Boot CD & MemTest86 diagnostic stress
testing tools for USB boot to Windows 10 PE & WinXPmini on BIOS & UEFI
(As always, please improve so that all benefit from every action you take.)
Thanks to Mike Easter for suggesting Hiram BootCD USB diagnostic tools.
o What hardware diagnostic stress-testing freeware can you recommend?
<https://groups.google.com/forum/#!topic/alt.comp.freeware/dkkdOmL95d8>
End result:
a. A 2GB USB stick can boot with BIOS/UEFI to Win10PE for diagnostics
a. A 2GB USB stick can boot with BIOS to WinXPMini for hardware diagnostics
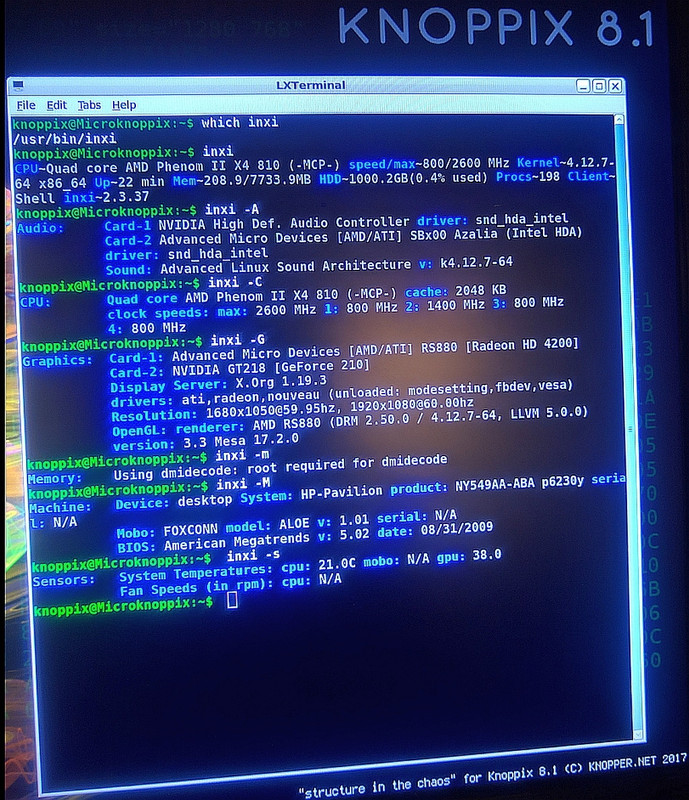
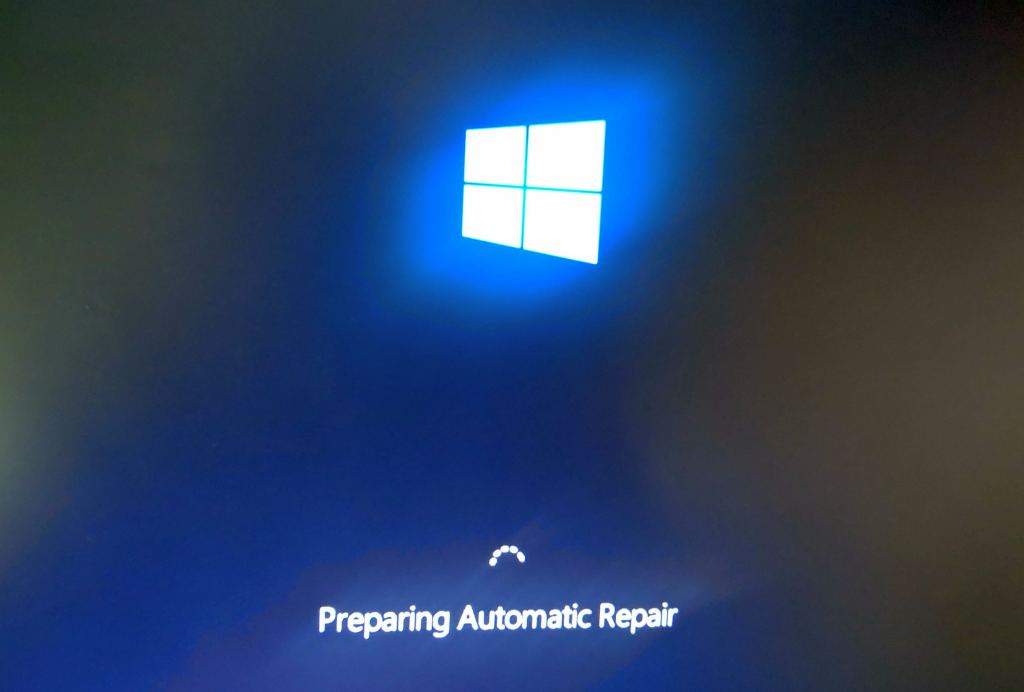
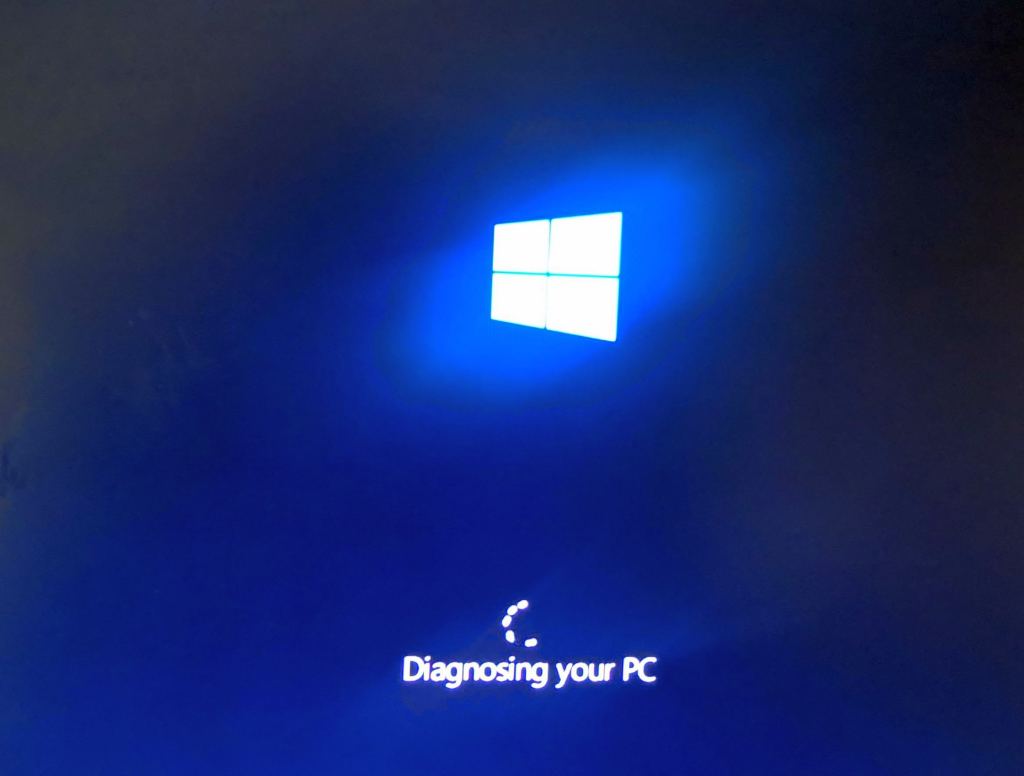
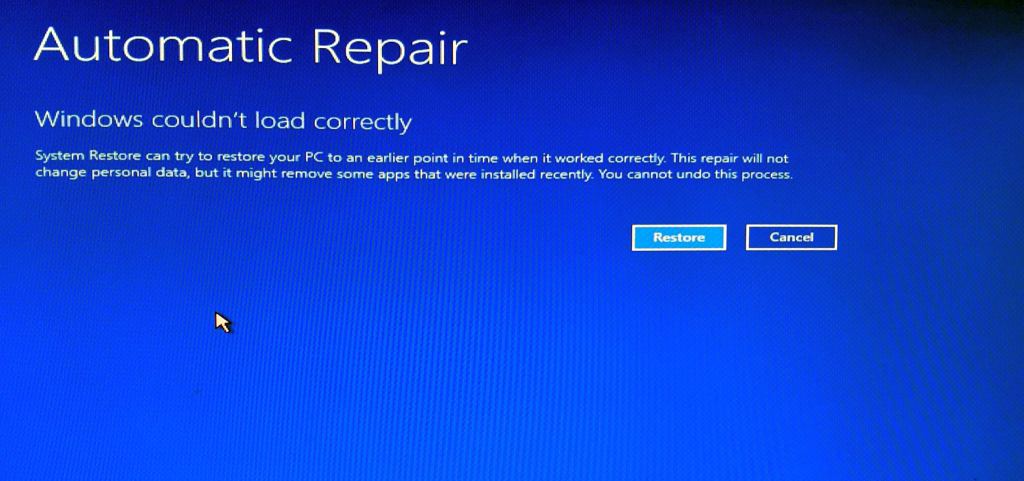
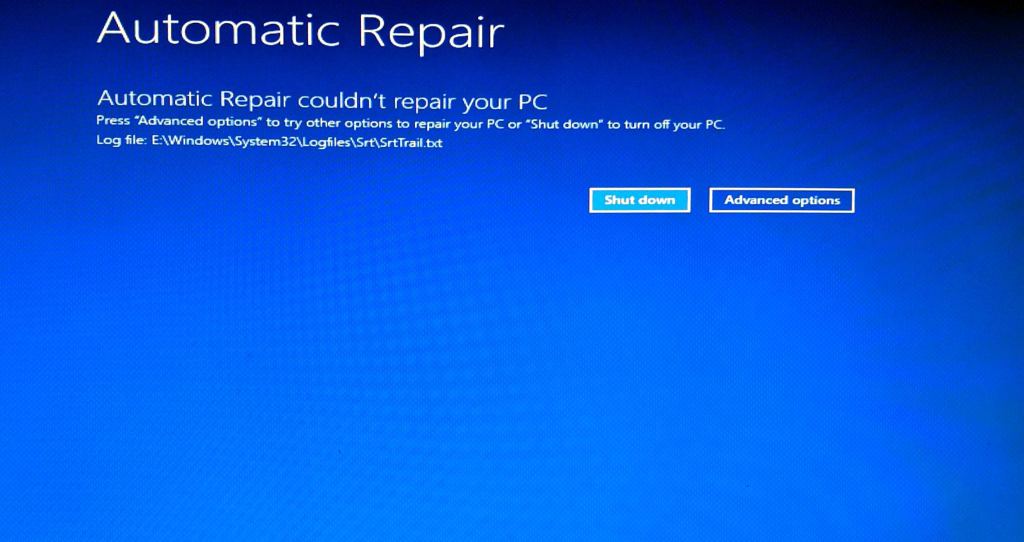
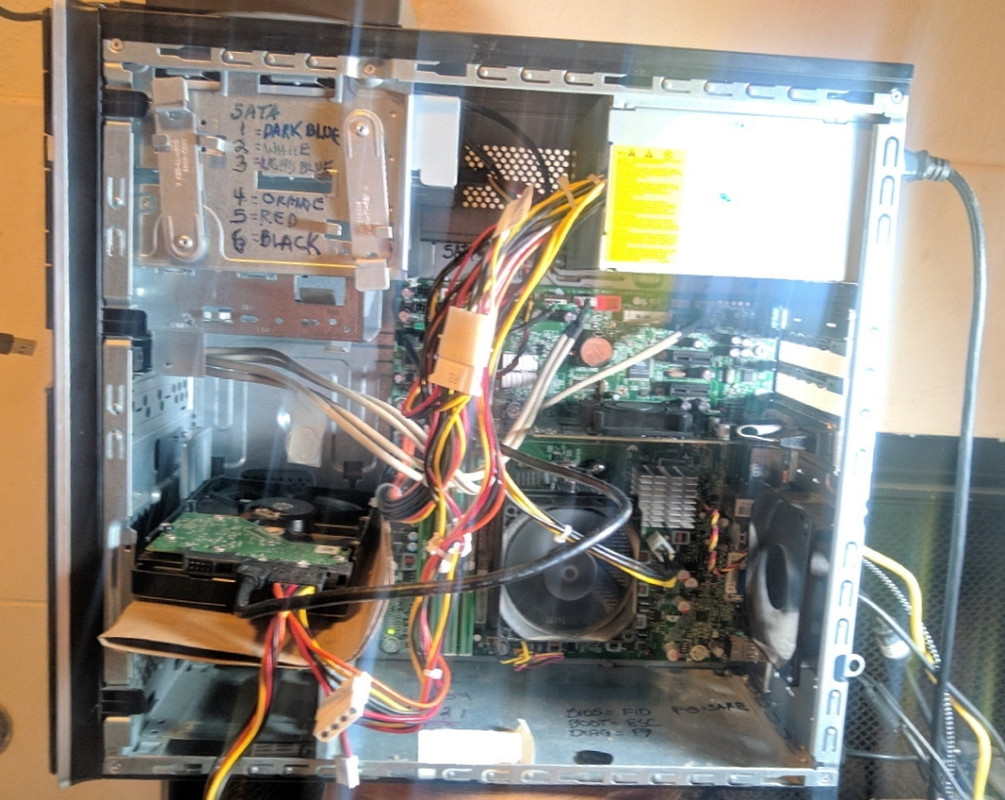
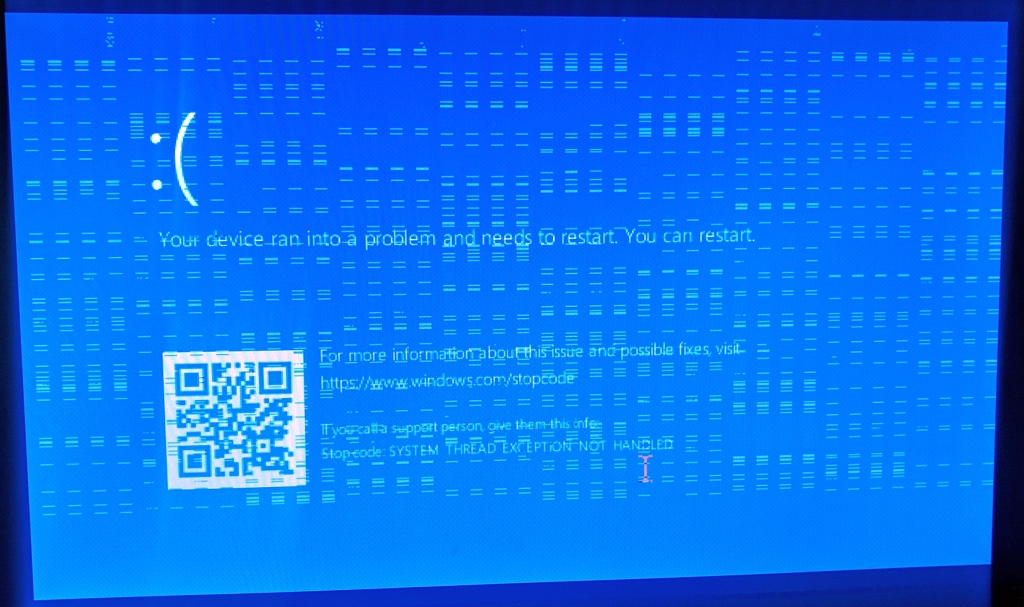
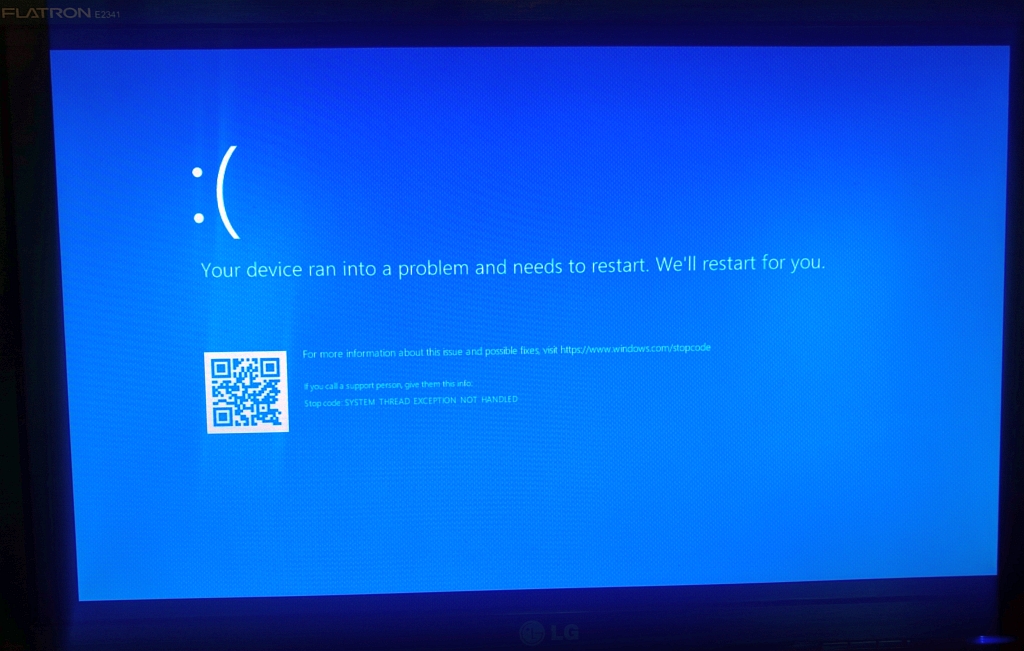
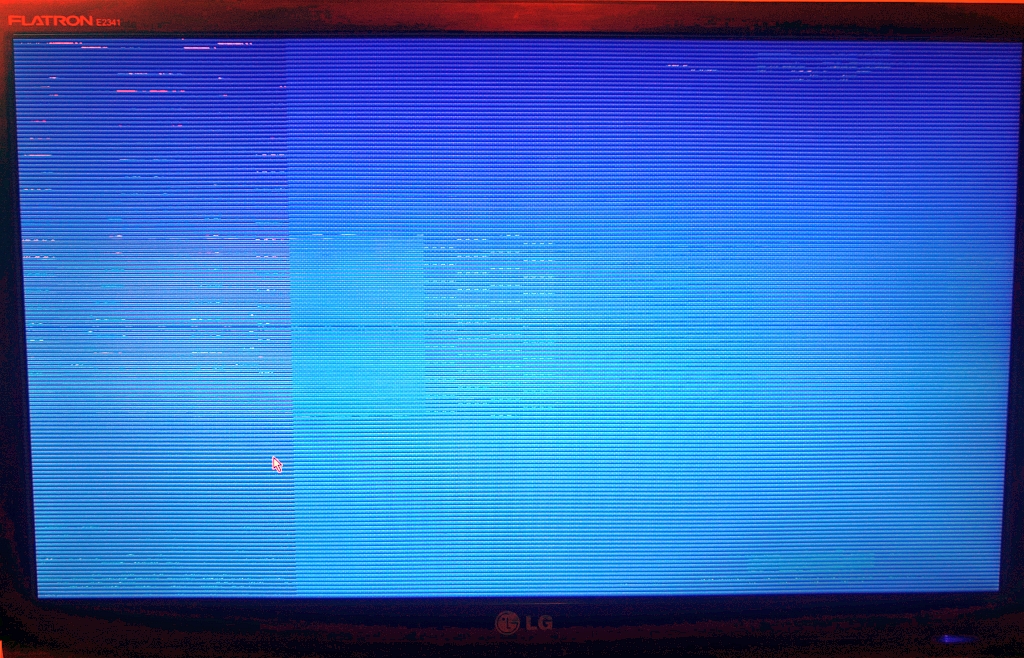
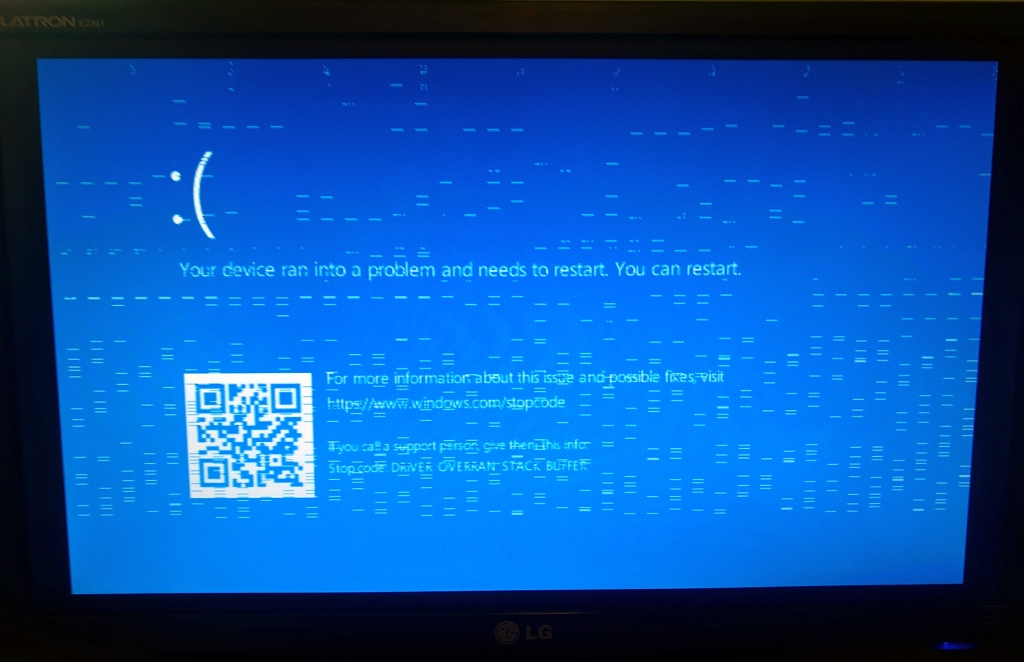
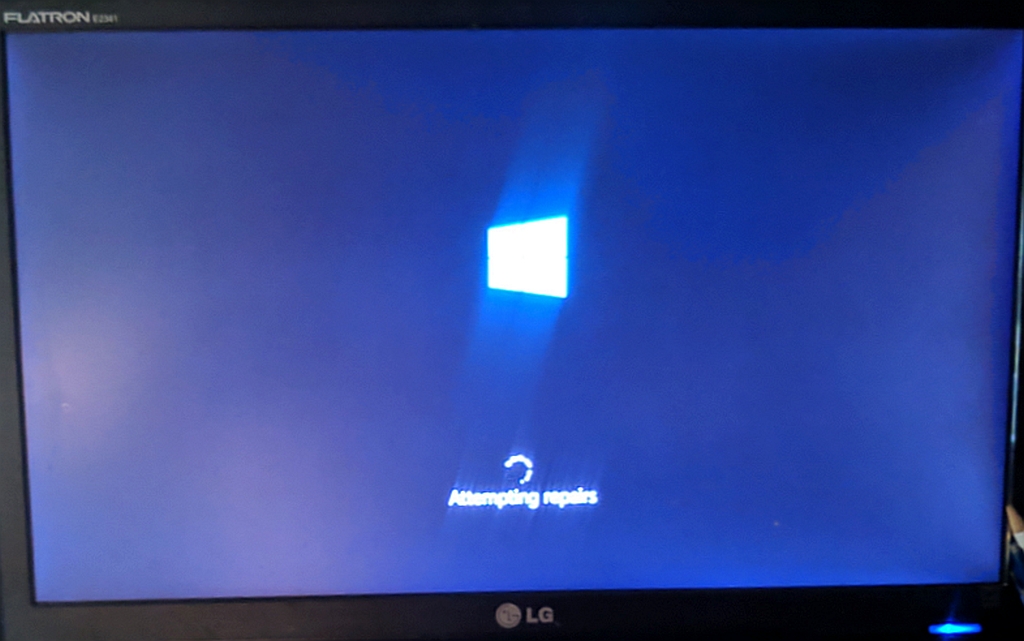
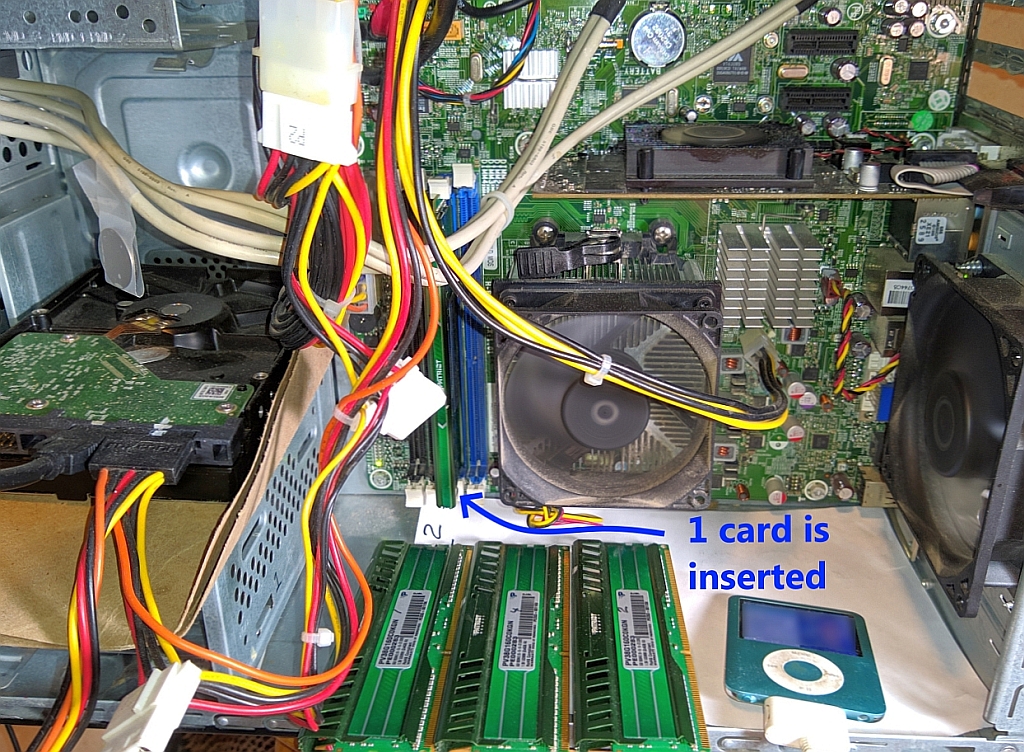
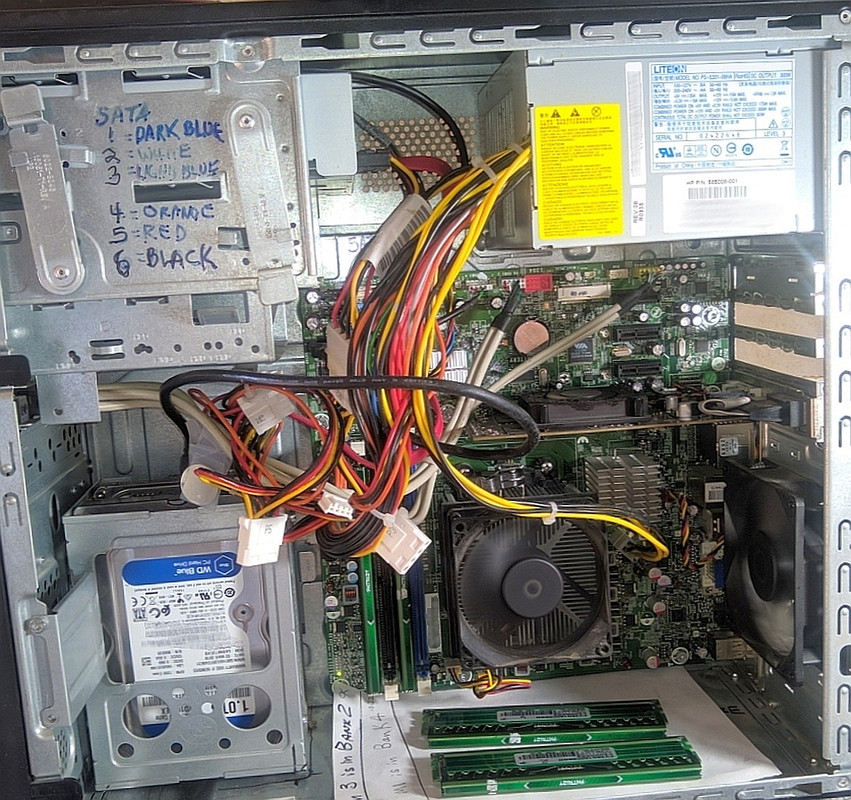
I needed to debug hardware issues on an old 2009 desktop as described here:
o What PC hardware diagnostic stress-testing freeware can you recommend?
<https://groups.google.com/forum/#!topic/alt.comp.freeware/dkkdOmL95d8>
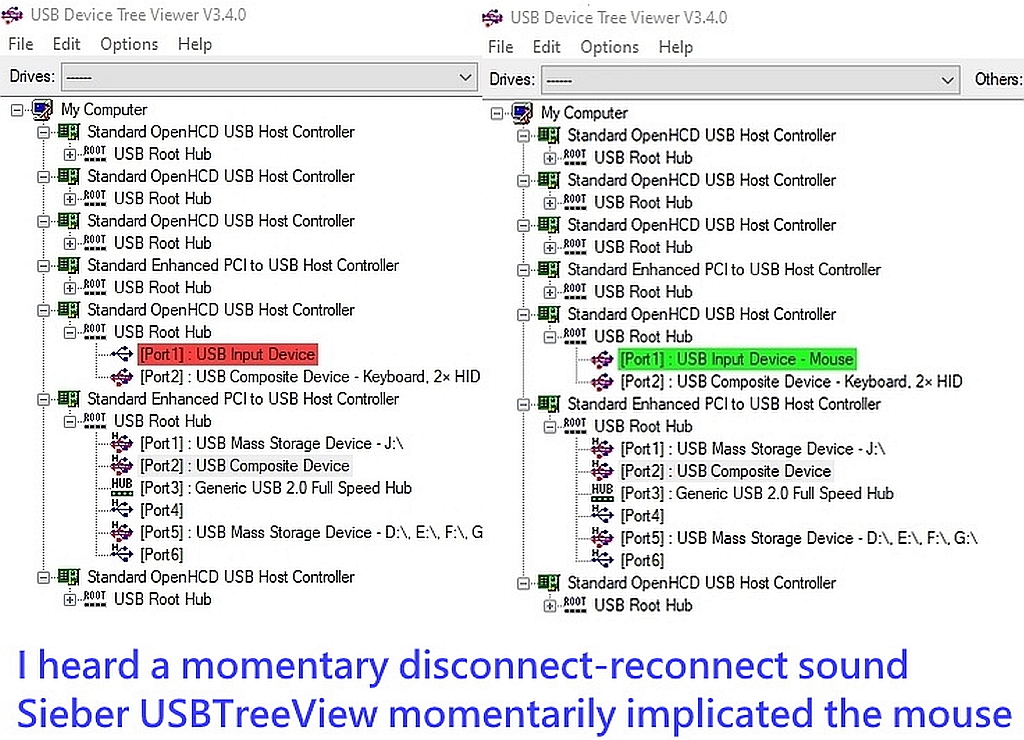
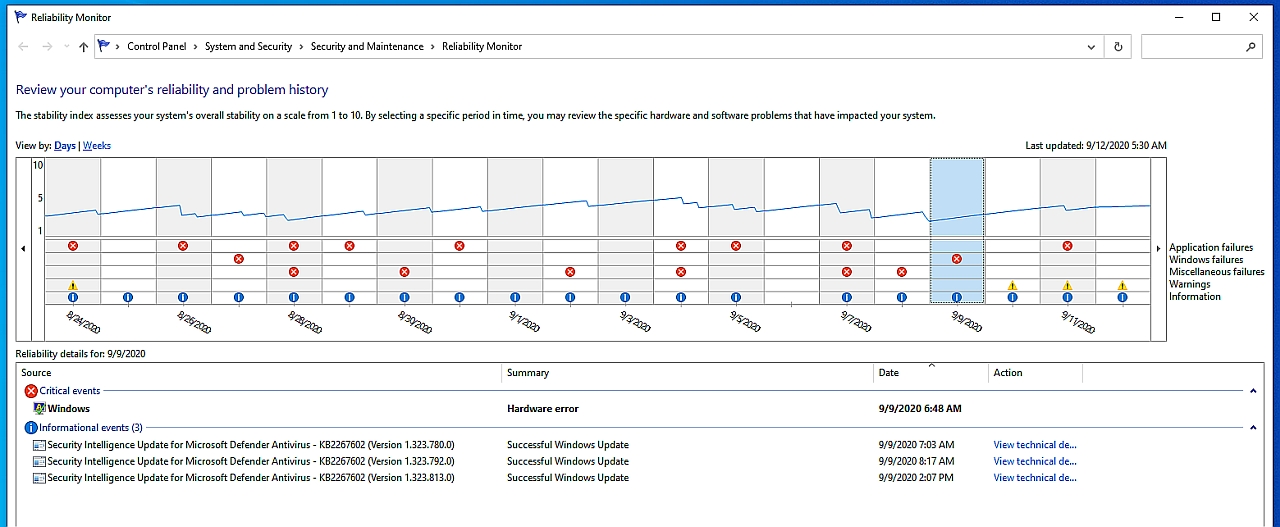
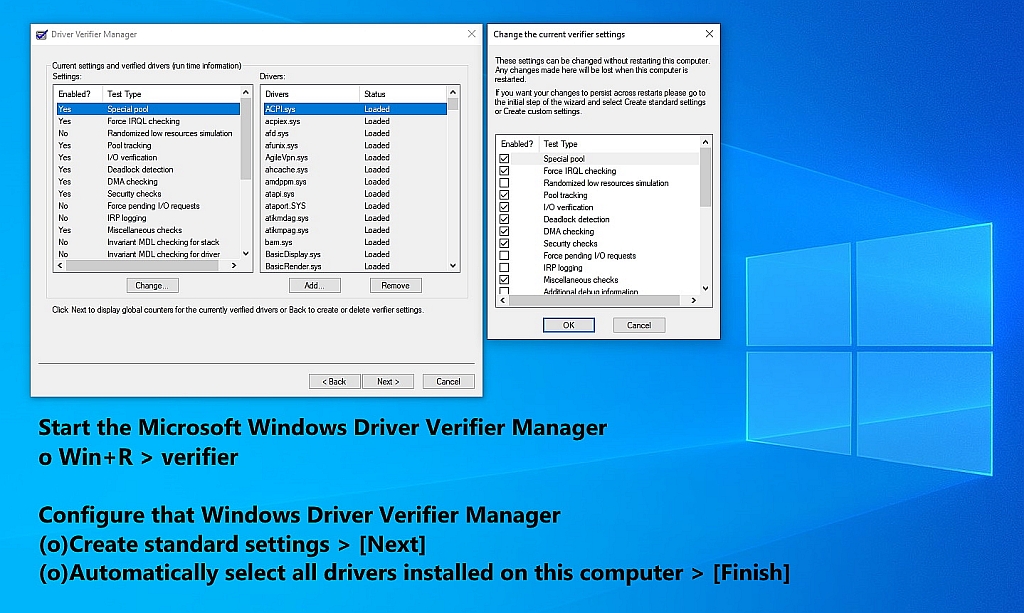
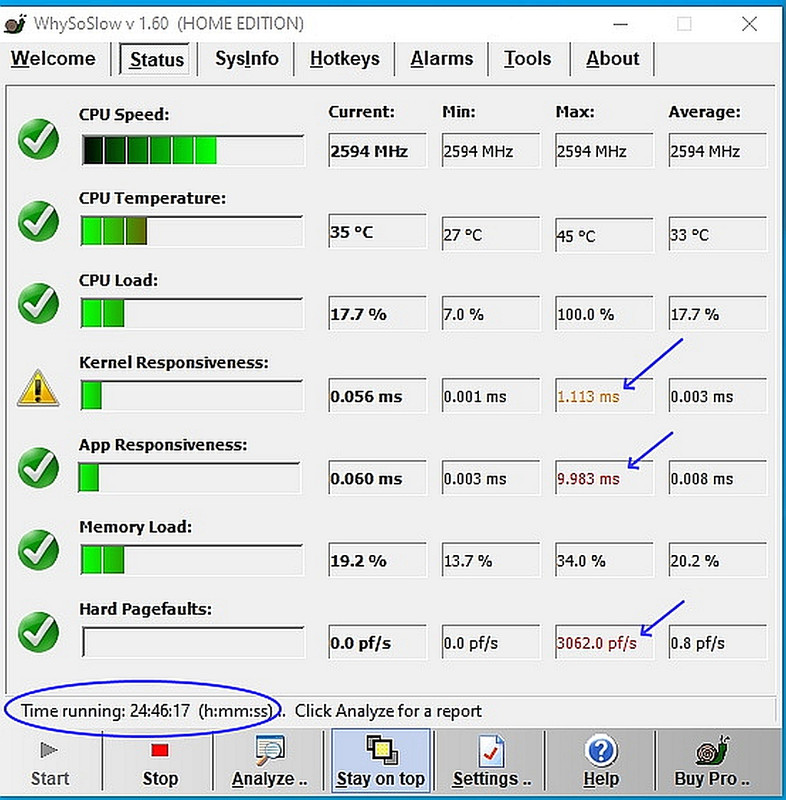
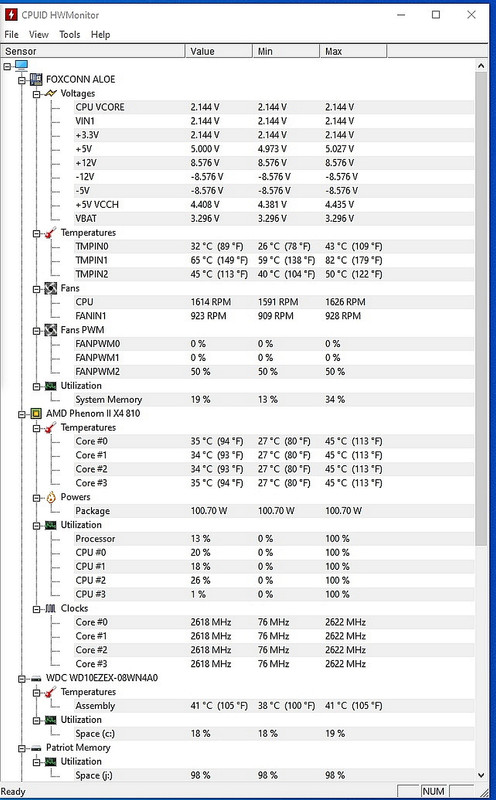
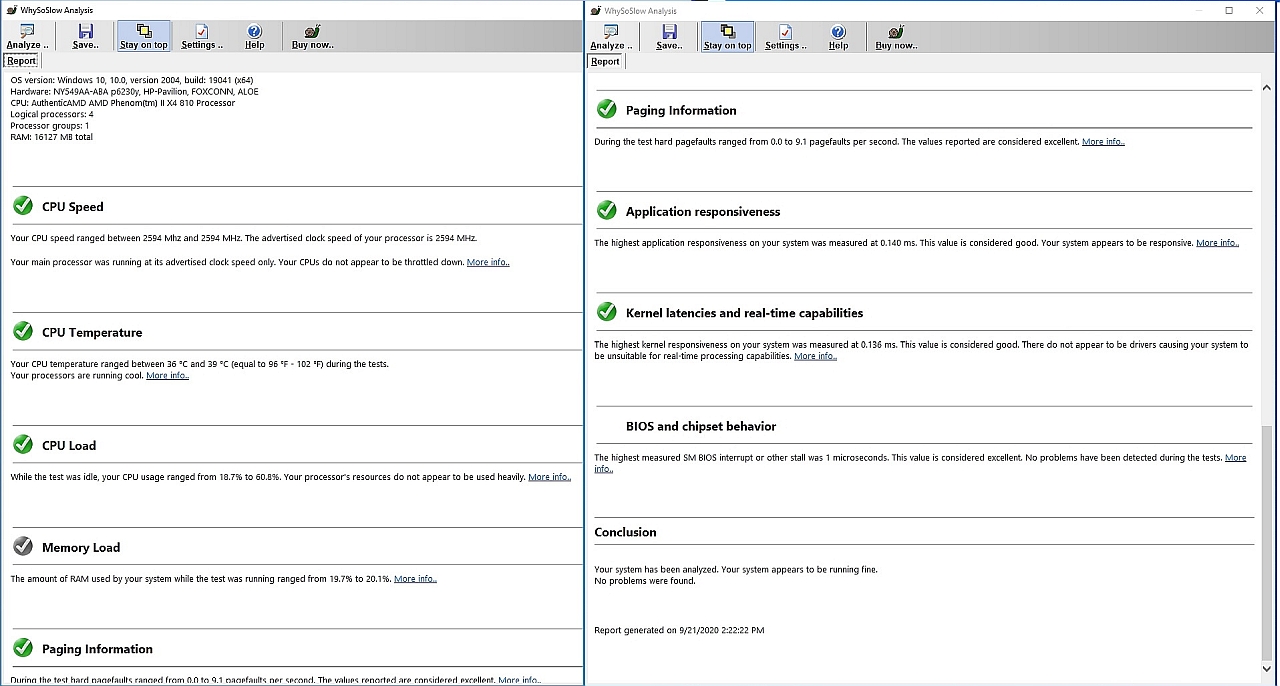
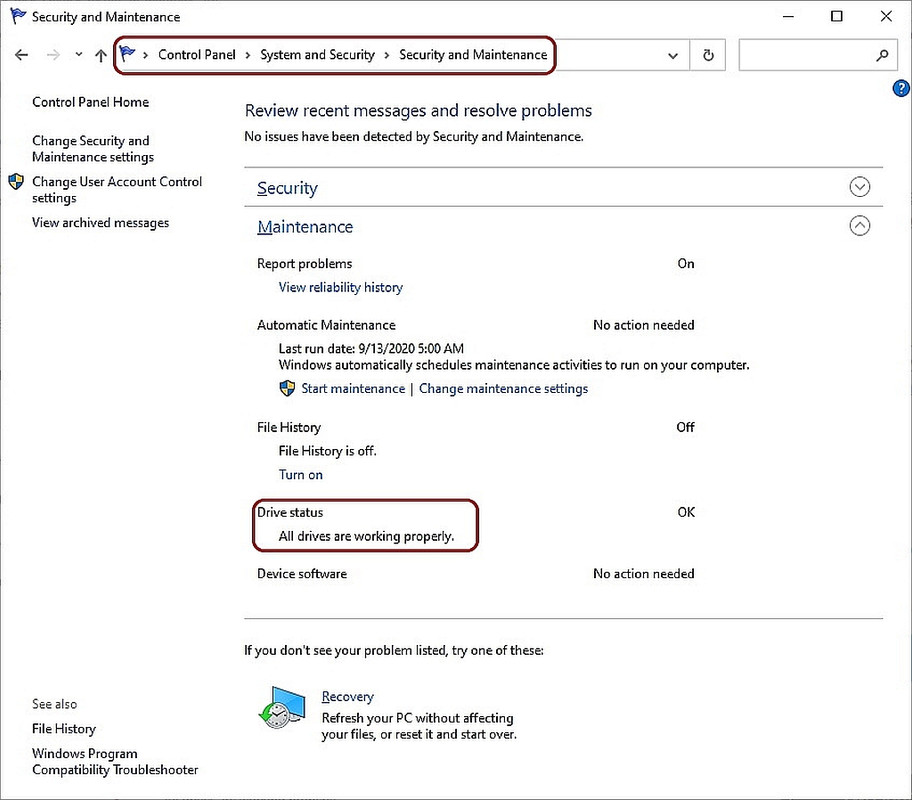
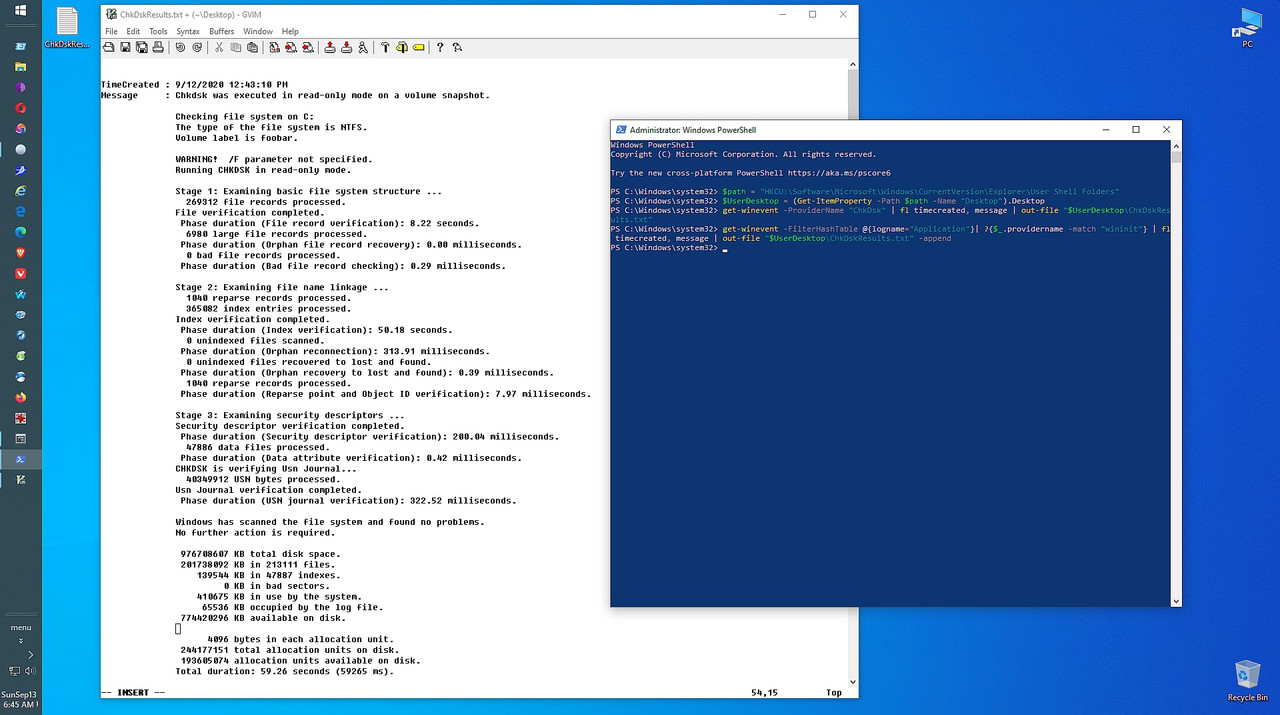
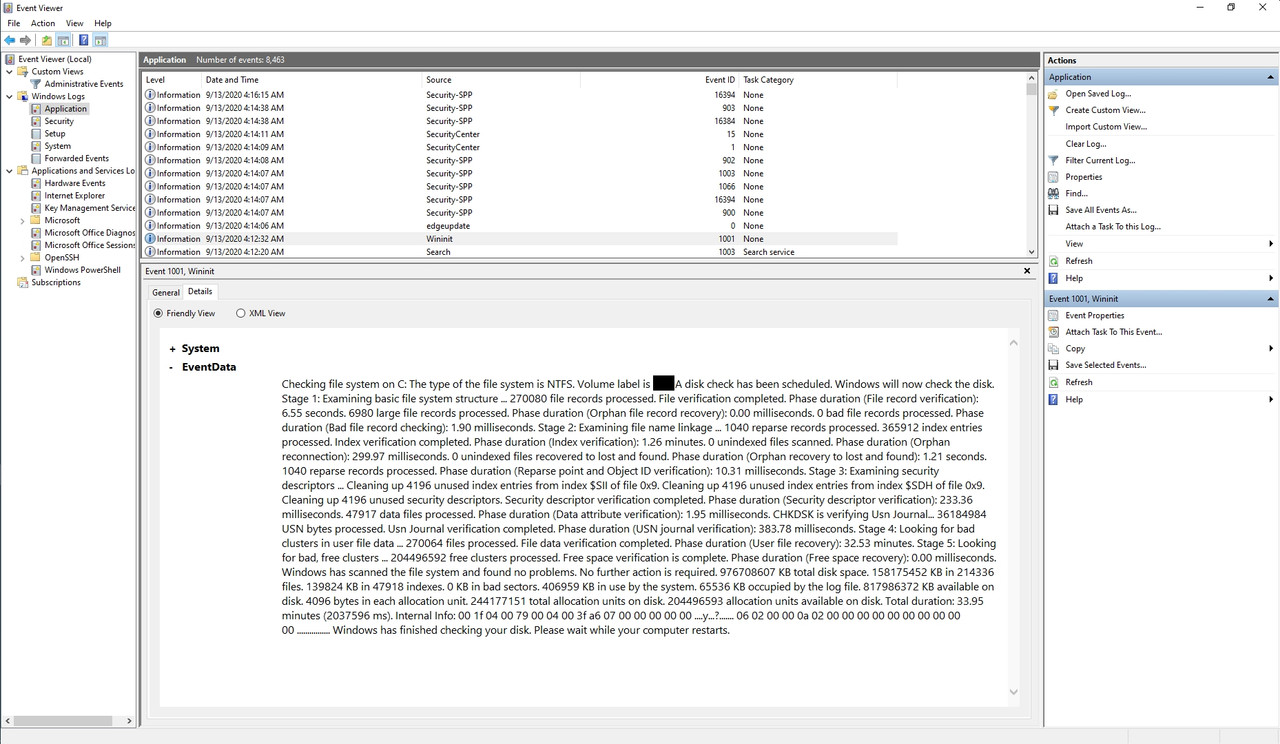
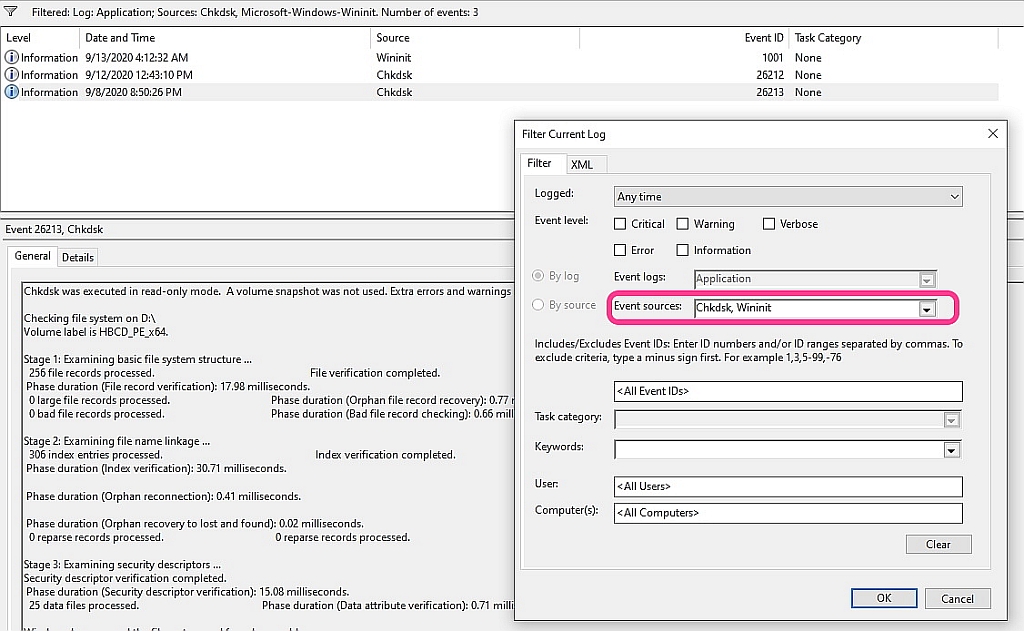
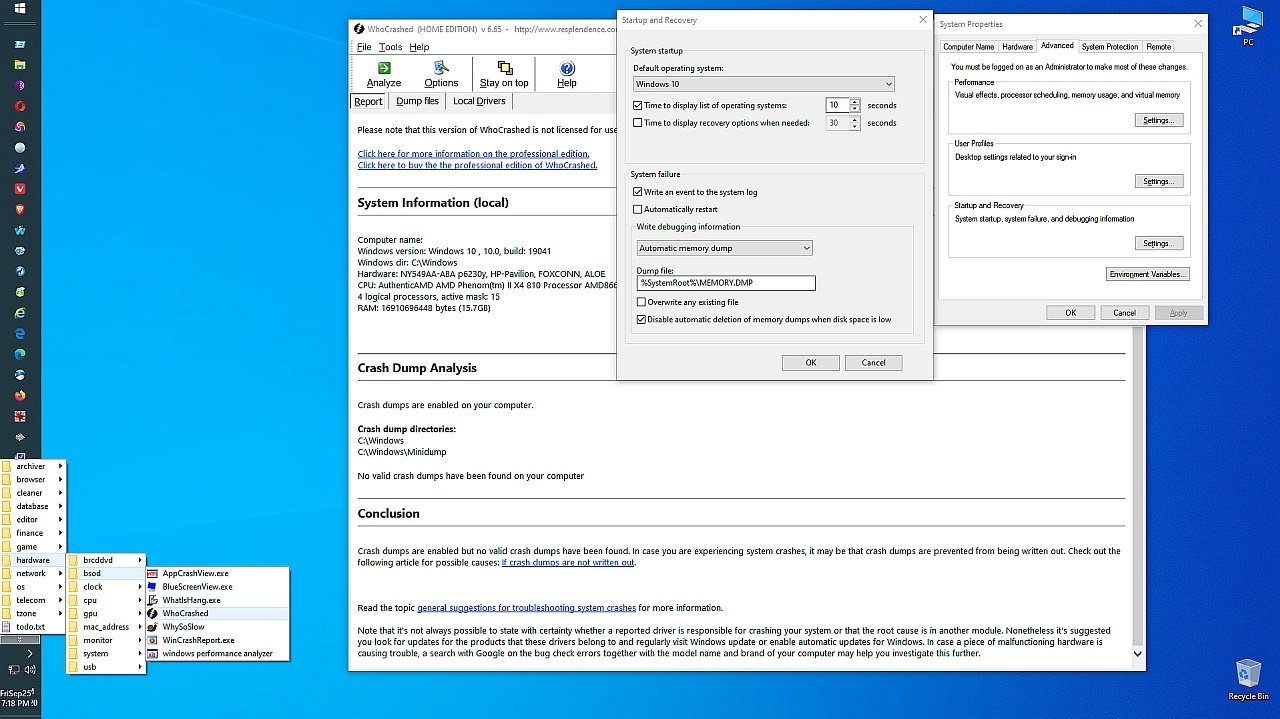
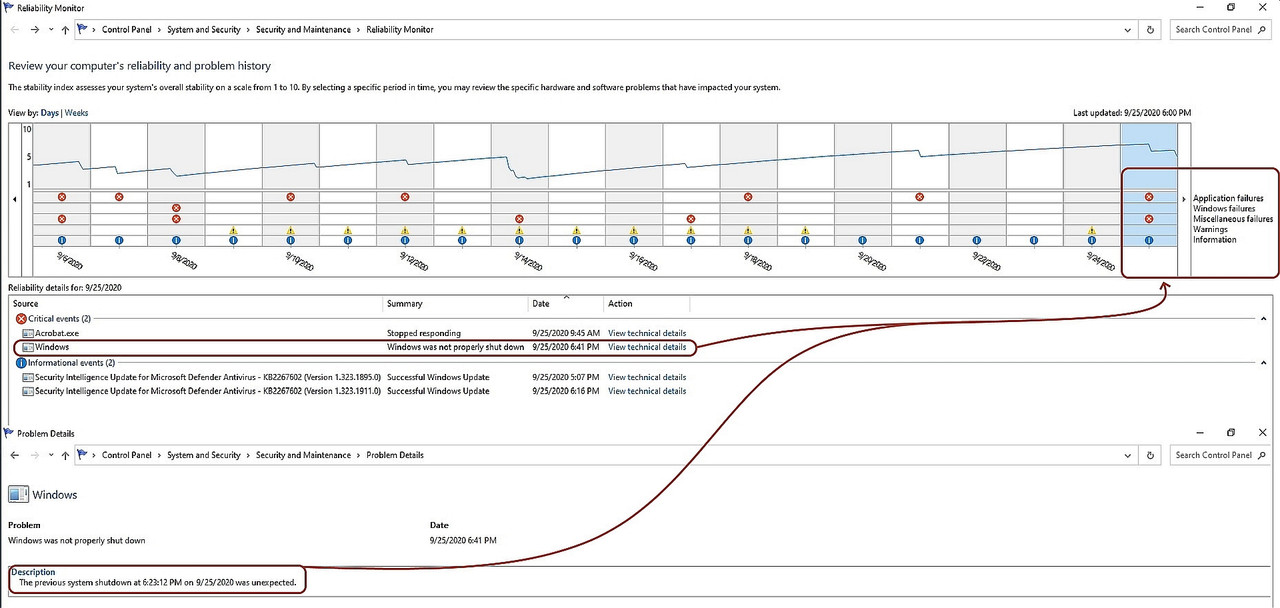
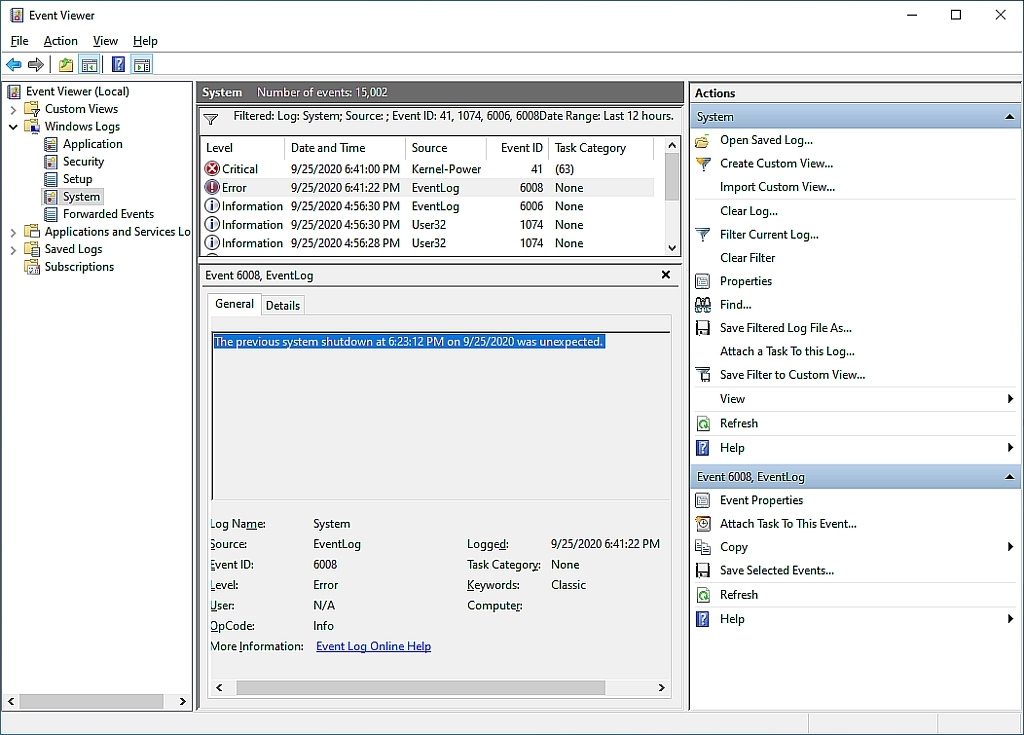
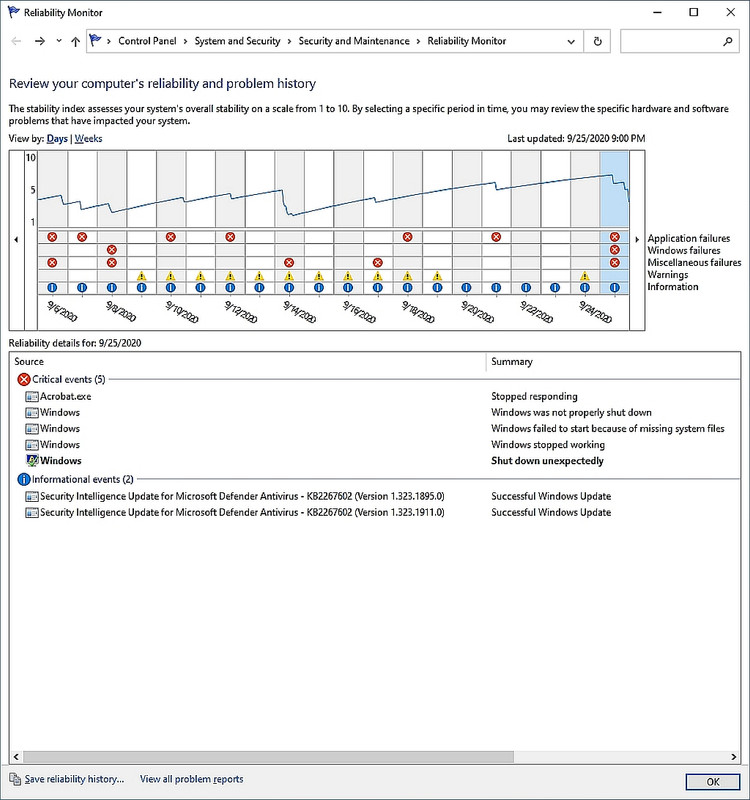
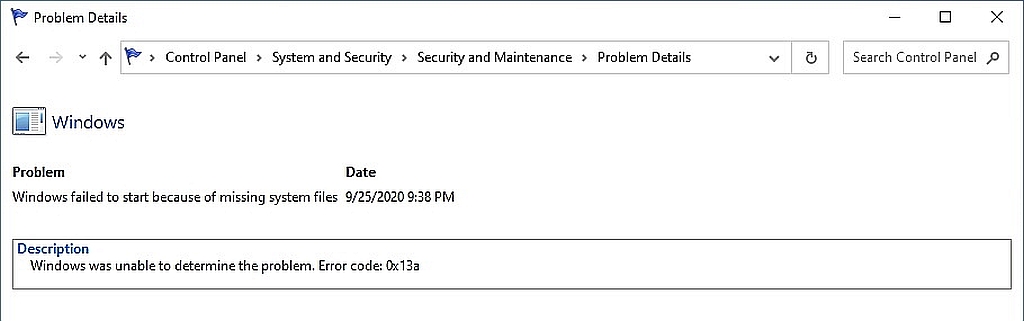
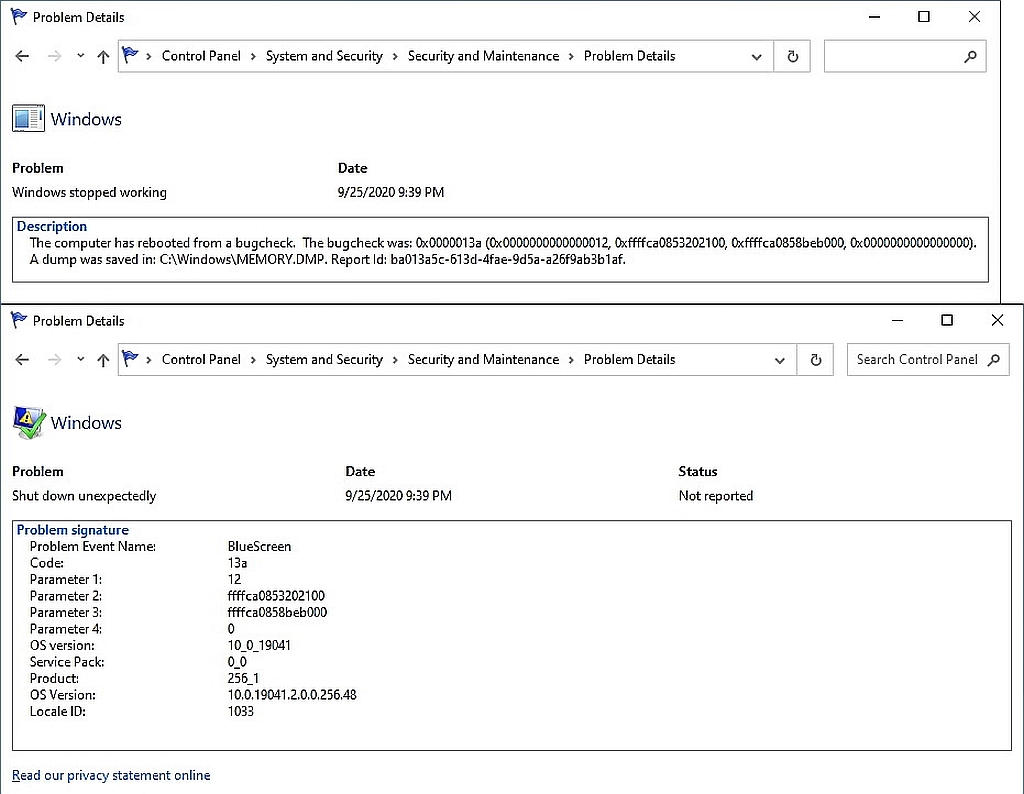
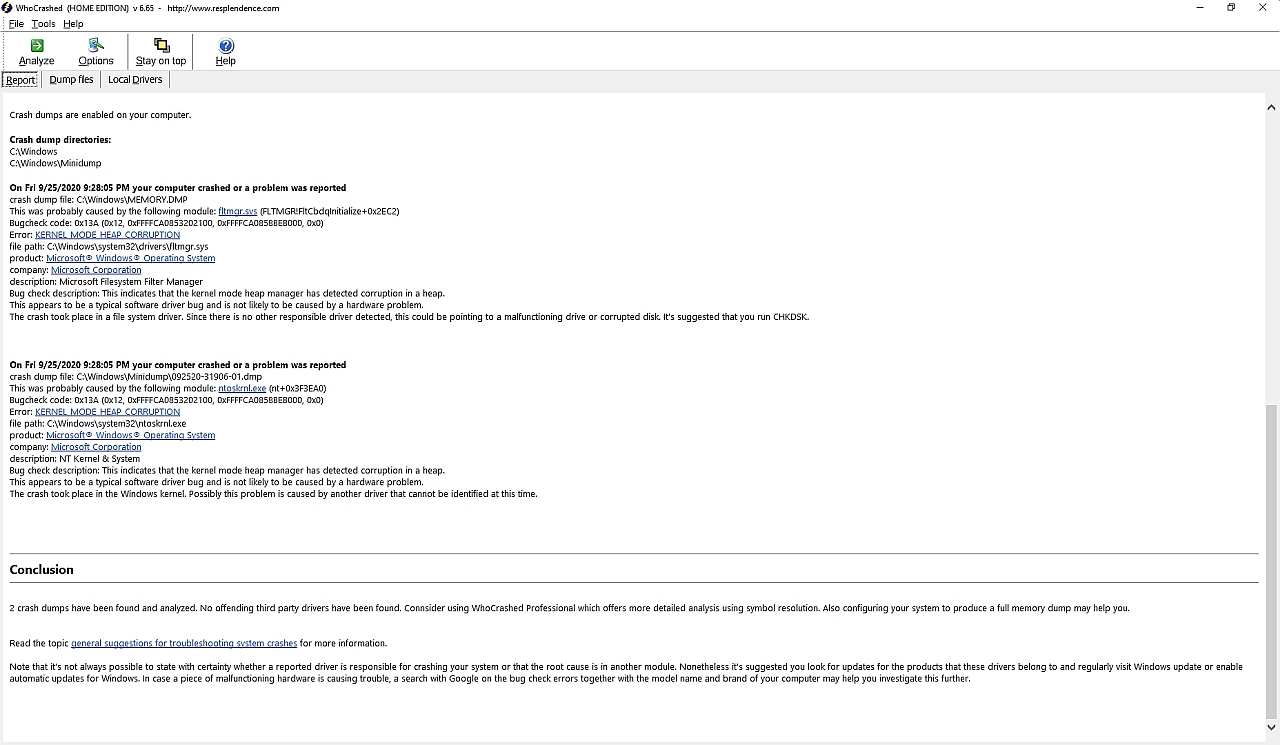
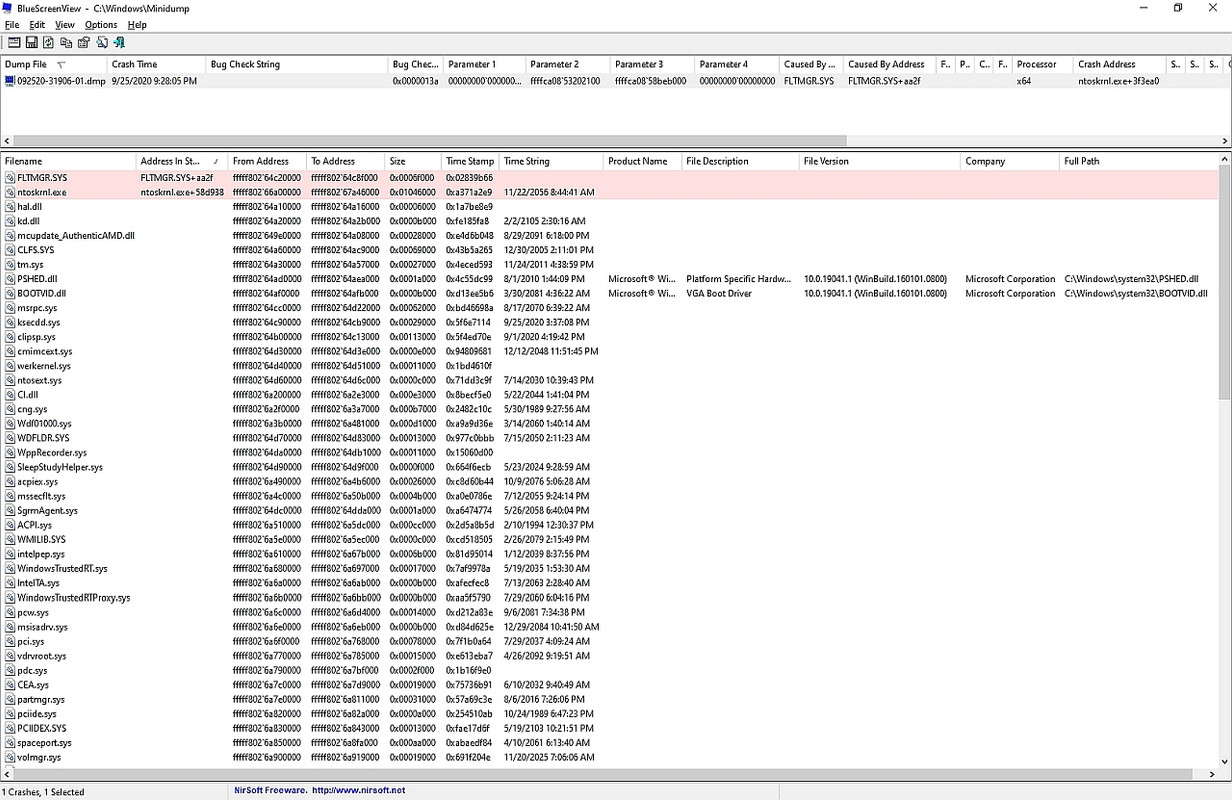
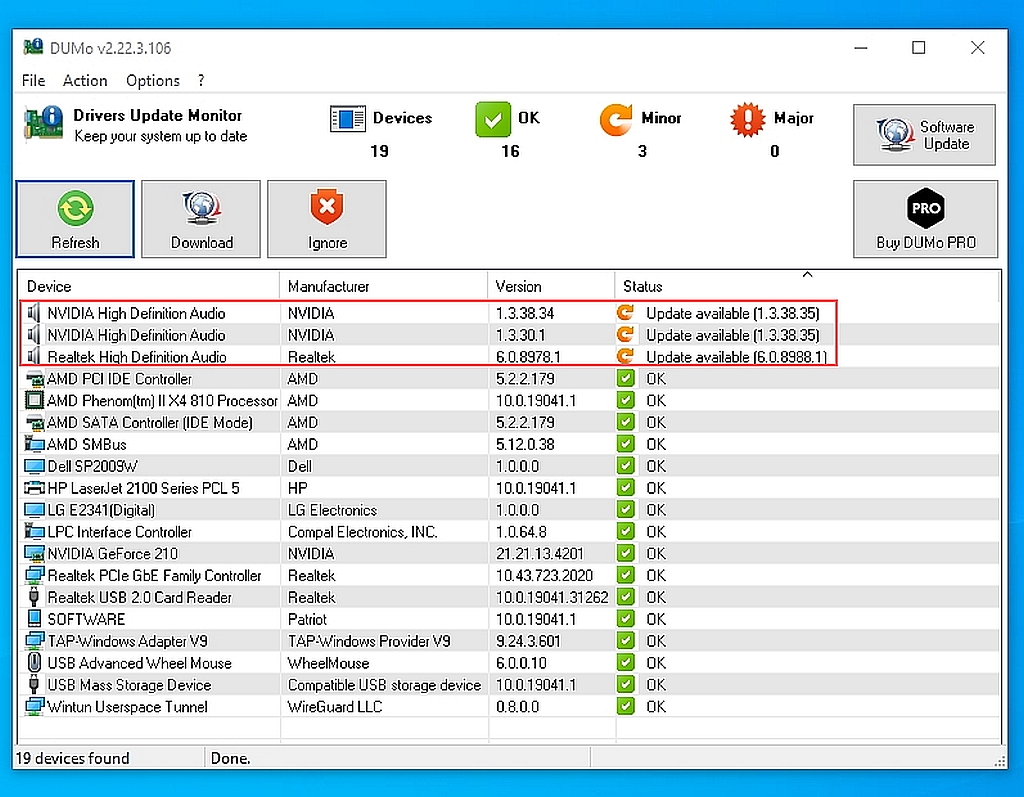
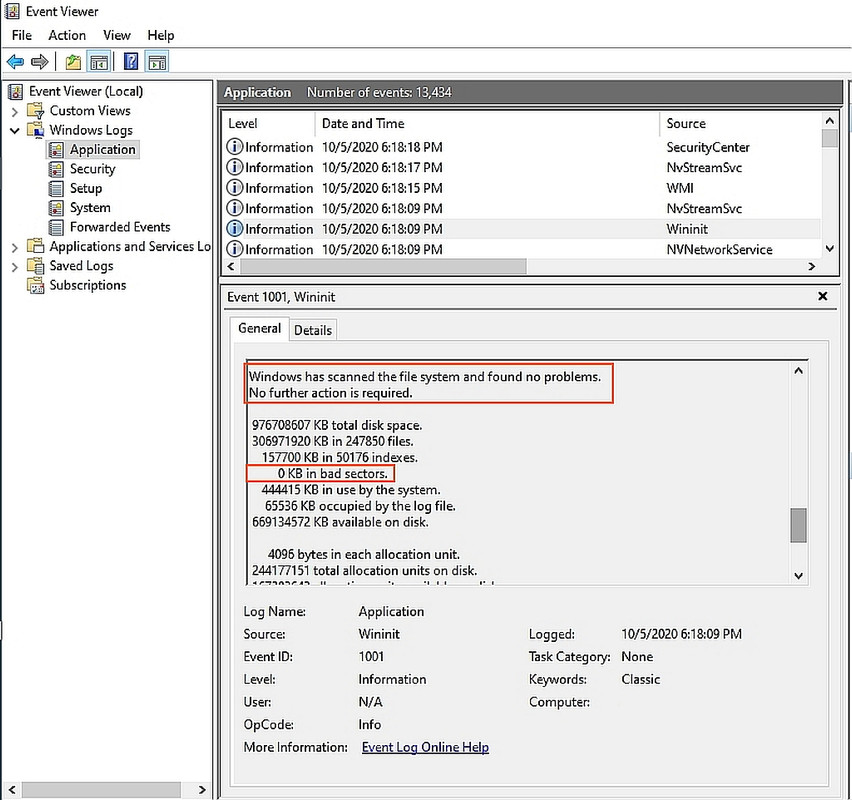
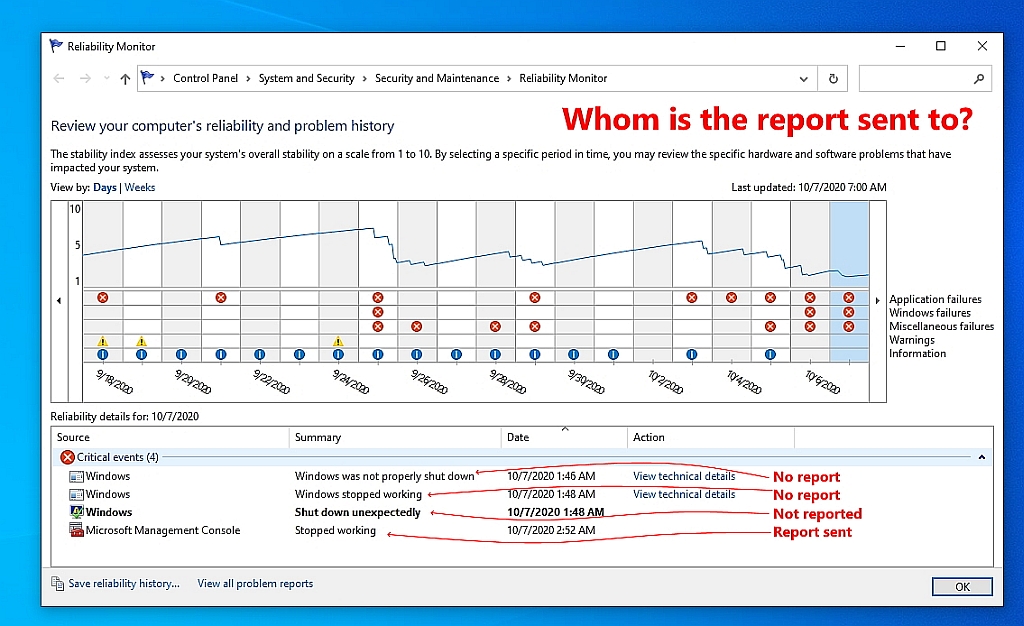
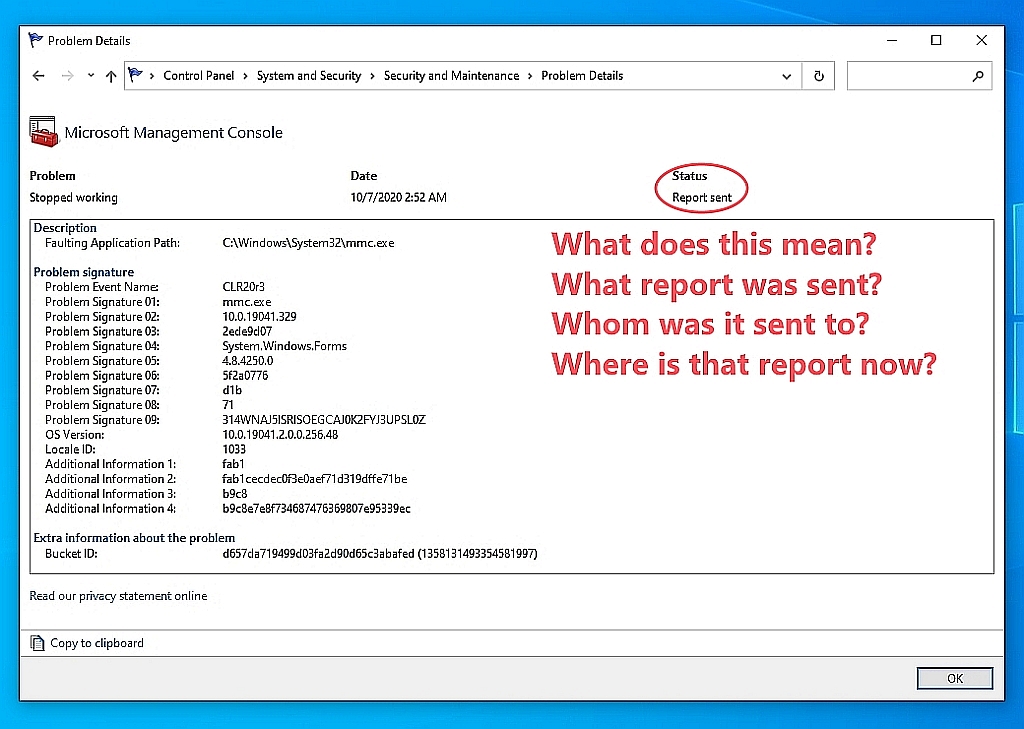
Win+R > perfmon /rel
<Loading Image...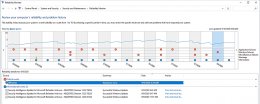 >
>
This step-by-step tutorial resulted, written so that others always benefit.
(Please test & improve as this is the first pass of this nascent tutorial.)
1. Find an empty USB flash drive of at least 2GB size:
o Hirens BootCD Win10PE used about 1.25 GB of my 1.90 GB flash stick.
<Loading Image...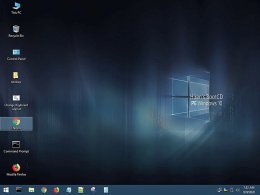 >
>
o Hirens BootCD 15.2 used about 0.58 GB of my 1.90 GB flash stick.
<Loading Image... >
>
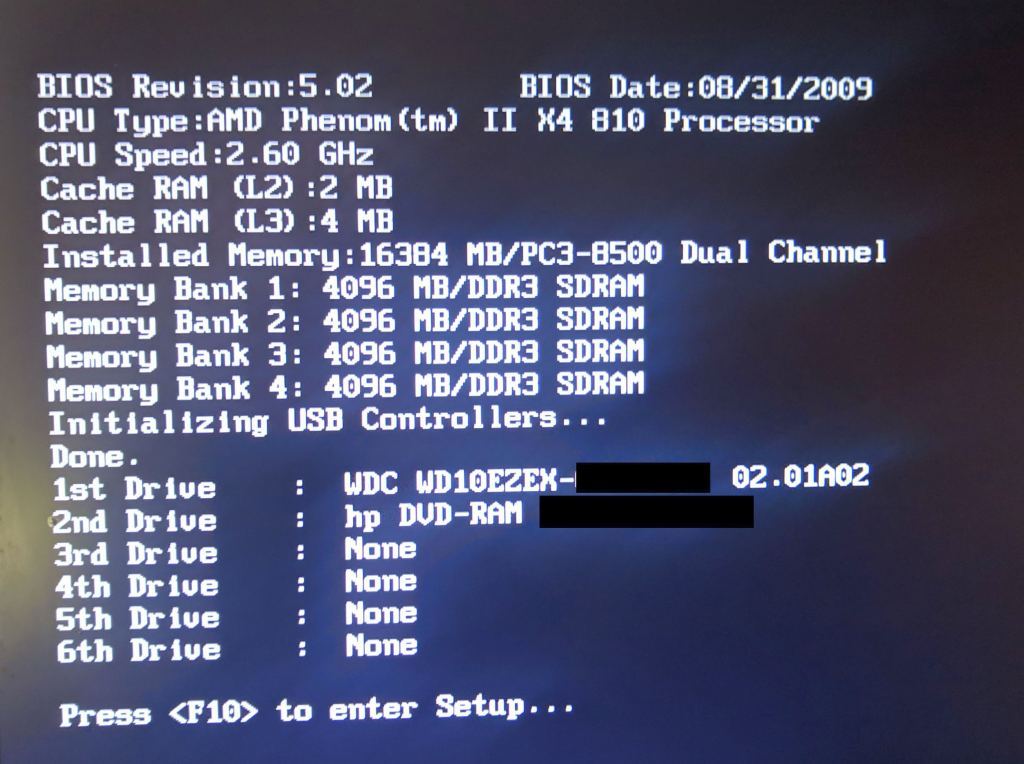
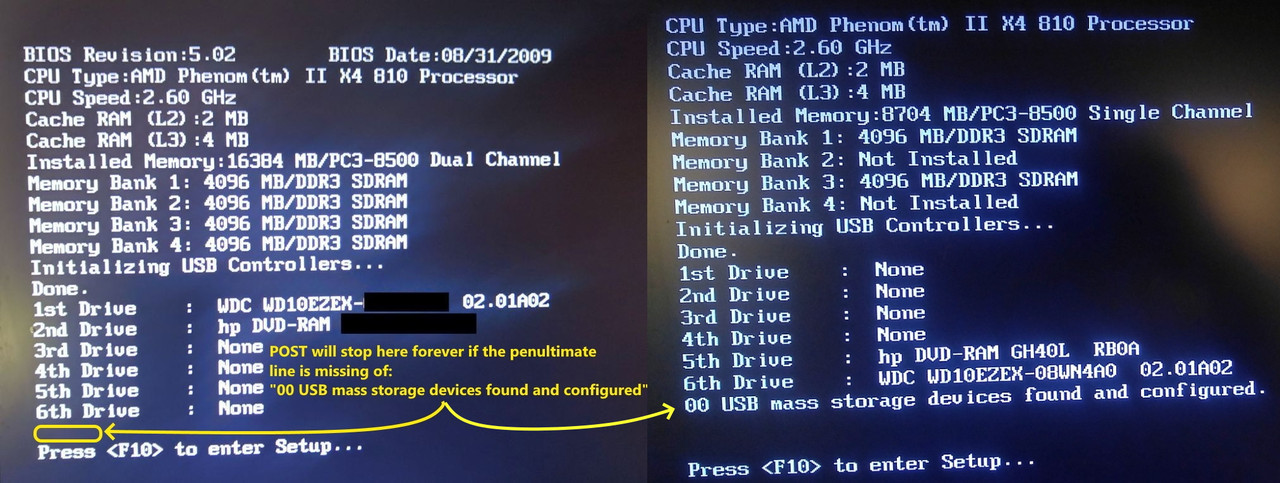
2. Determine whether your PC is BIOS or UEFI (mine is BIOS).
Win+R > %comspec% /k findstr Callback_BootEnvironmentDetect %SystemRoot%\Panther\setupact.log
o %SystemRoot%\Panther\setupact.log
- Callback_BootEnvironmentDetect: Detected boot environment: BIOS
- Callback_BootEnvironmentDetect: Detected boot environment: UEFI
Note: Mine reported BIOS
Win+R > msinfo32 > System Summary > BIOS Mode
- Win+R > msinfo32 > System Summary > BIOS Mode > Legacy
- Win+R > msinfo32 > System Summary > BIOS Mode > UEFI
Note: Legacy === BIOS
3. If needed, set your PC boot order so that it boots from the USB stick.
For me the defaults worked: i.e., at POST, F10==BIOS, ESC=BOOT, F9=DIAG
Entering Setup > Boot > Boot Device Priority
1st Boot Device = [CD-ROM Group]
2nd Boot Device = [Floppy Group]
3rd Boot Device = [HDD Group]
4th Boot Device = [Network Boot Group]
Note: USB isn't mentioned in my BIOS; but USB booted fine nonetheless.
4. Download the Hiren's Boot CD software containing diagnostic tools:
<http://www.hirensbootcd.org/download/>
a. UEFI/BIOS Win10PE:
Download either the Win10PE BIOS/UEFI HirensBootCD (HBCD) ISO file:
<https://www.hirensbootcd.org/files/HBCD_PE_x64.iso>
<https://www.hirensbootcd.org/files/HBCD_PE_x64.iso>
<http://mirror.sfo12.us.leaseweb.net/hirensbootcd/HBCD_PE_x64.iso>
Name: HBCD_PE_x64.iso
Size: 1354811392 bytes (1292 MiB)
SHA256: D67BCF0437A1BD27F31655C4A9C81C93269A5A239D43F38D0375618443D372BC
b. BIOS WinXPmini:
Or download the BIOS-only WinXPmini HirensBootCD (HBCD) ISO file:
<http://www.hirensbootcd.org/files/Hirens.BootCD.15.2.zip>
Name: Hiren's.BootCD.15.2.iso
Size: 603979776 bytes (576 MiB)
SHA256: 50384A61D304E06B720F9EF729C662D2E9EDA05A96E1C9056975C40E3BF3F2D0
Note: The tools on these two releases are both the same & different:
<Loading Image...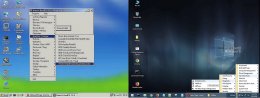 >
>
5. Download the Windows Rufus ISO-to-USB tool:
<https://rufus.ie/>
<https://github.com/pbatard/rufus/releases/download/v3.11/rufus-3.11.exe>
Name: rufus-3.11.exe
Size: 1155640 bytes (1128 KiB)
SHA256: A43BF34285D393F843B05D80F74C4790ED7F6AC636393CA5F6375AE0BB02E719
6. Remove all USB drives & insert the empty USB flash drive into the PC.
7. In Windows, right click on the Rufus executable to run as administrator.
NOTE: The specific settings for creating a BIOS Win10PE USB are not
documented anywhere on the net I could find, so please take note:
<Loading Image...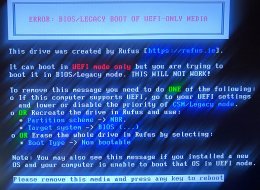 >
>
a. UEFI Win10PE
To create a bootable USB stick for HBCD_PE_x64.iso on UEFI machines:
When you start Rufus as an admin, accept the Win10 UAC consent prompt.
This brings up the Rufus 3.11.1678 GUI
Set the options to:
- Device: (choose your empty USB stick drive letter and label)
(If you only have one USB stick plugged in, it will default to it.)
- Boot selection:
(Choices are: "Disk or ISO image", "FreeDOS", "Non bootable")
I left the Boot selection at "Disk or ISO image".
I pressed the [SELECT] button to choose the "HBCD_PE_x64.iso" file.
- Partition scheme: GPT (The only options are "GPT" and "MBR")
Target System: The only option is "UEFI (non CSM)"
Volume label: This defaulted to "HBCD_PE_x64"
File system: FAT32 (other choices are "NTFS" & "FAT")
Cluster size: It defaulted to 4096 bytes (but other options existed).
When the Status says "READY", press the "START" button.
A warning pops up saying all data on the USB drive will be destroyed.
Press [OK].
The messages will be:
- Deleting partitions (This may take a while)...
- Partitioning (GPT)...
- Formatting (FAT32)...
- Creating file system: Task 1/5 completed.
- Creating file system: Task 2/5 completed.
- Creating file system: Task 3/5 completed.
- Creating file system: Task 4/5 completed.
- Creating file system: Task 5/5 completed.
- Writing Master Boot Record
- Copying ISO files:
- Success
(Mine took six minutes to complete from start to finish.)
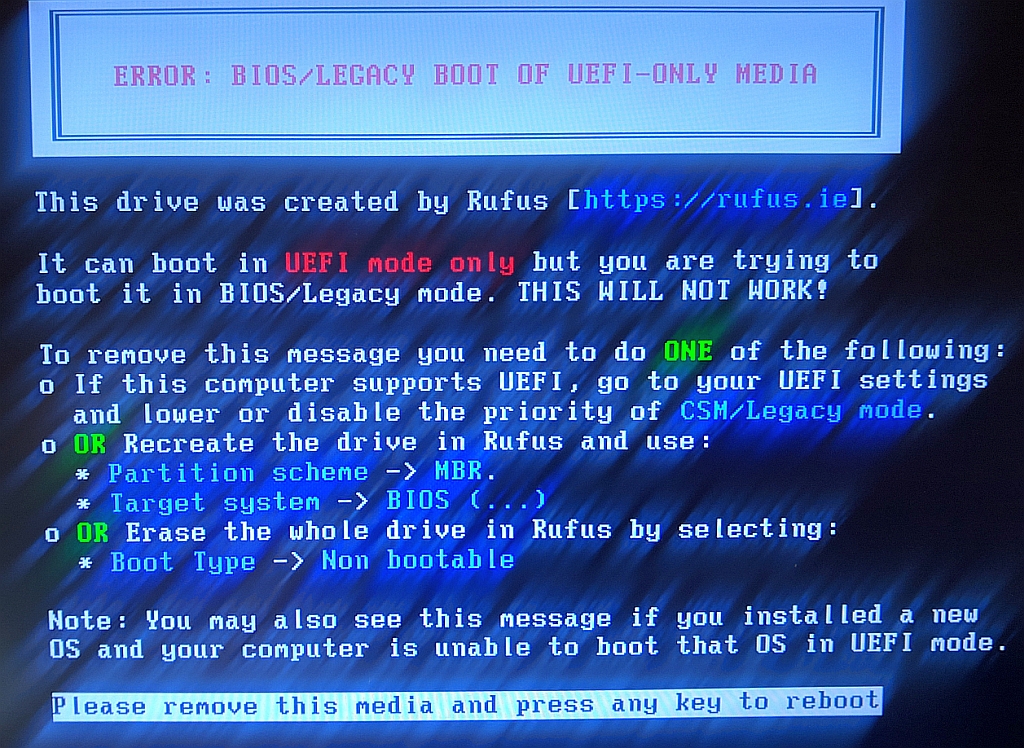
Note: You'll get this error if you create a UEFI USB but boot on BIOS:
<https://i.postimg.cc/2ykDXjW6/hiren01.jpg>
ERROR: BIOS/LEGACY BOOT OF UEFI-ONLY MEDIA
Recreate the drive in RUFUS and use:
* Partition scheme -> MBR
* Target system -> BIOS
b. BIOS Win10PE
To create a bootable USB stick for HBCD_PE_x64.iso on BIOS machines:
* Partition scheme -> MBR
* Target system -> BIOS (it was the only option once MBR was set)
* File system -> NTFS (it was the only option once MBR was set)
(Mine took five minutes to complete from start to finish.)
c. BIOS WinXPmini
To create a bootable USB stick for HBCD 15.2 on BIOS machines:
Boot selection -> Hiren's.BootCD.15.2.iso
Partition scheme -> "MBR" (it's the only option)
Target system -> "BIOS (or UEFI-CSM)" (it's the only option)
Volume label -> HBCD 15.2 (it's the default)
File system -> "FAT32" (other options are "FAT" & "NTFS")
Cluster size -> "4096 bytes (Default)"
[START] (Mine took 30 minutes to complete from start to finish.)
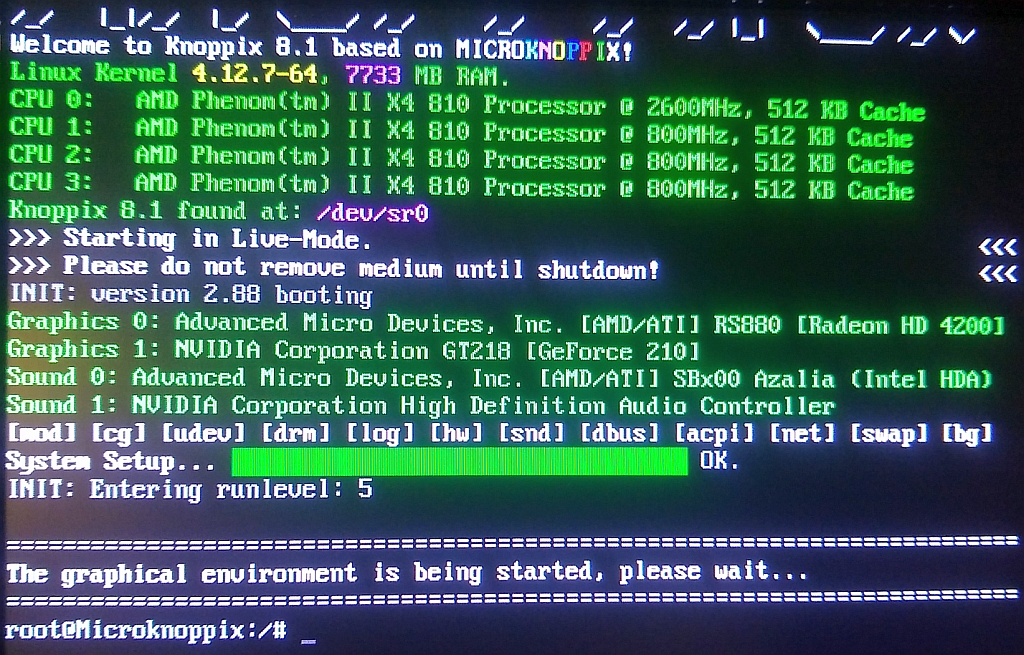
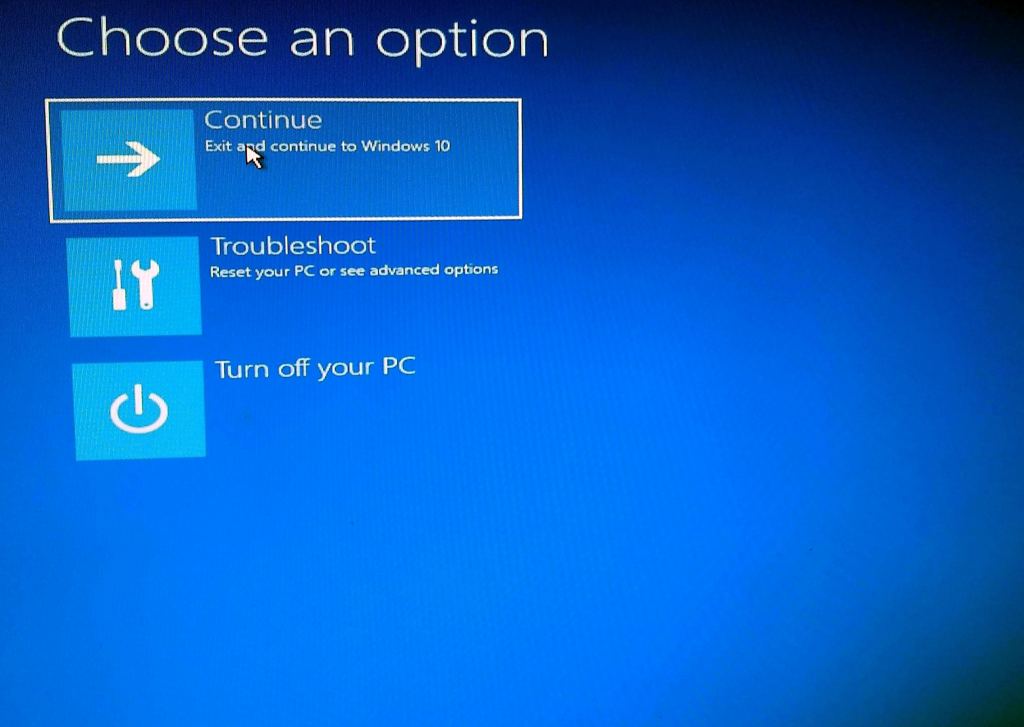
8. Now you can boot using that USB image on BIOS/UEFI for Win10/WinXP!
Note: In my case, I press "ESC" during POST to get to the boot menu.
Win10PE: <https://i.postimg.cc/HsGPFQSZ/hiren02.jpg>
WinXPMini: <https://i.postimg.cc/50BSJCK9/hiren07.jpg>
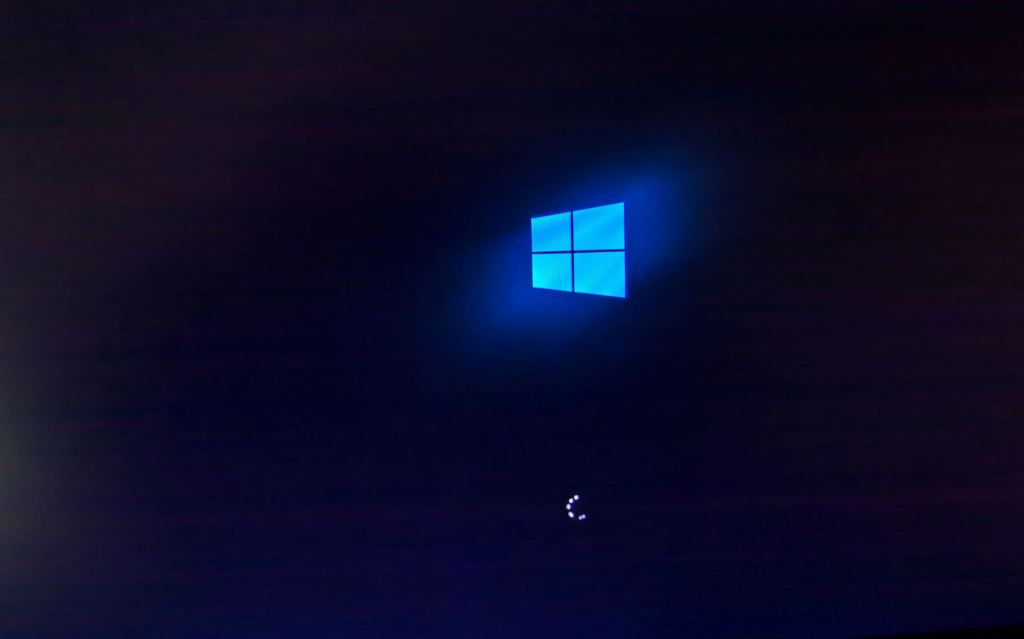
Note: My boot to Windows10PE was _much_ faster than to WinXPmini.
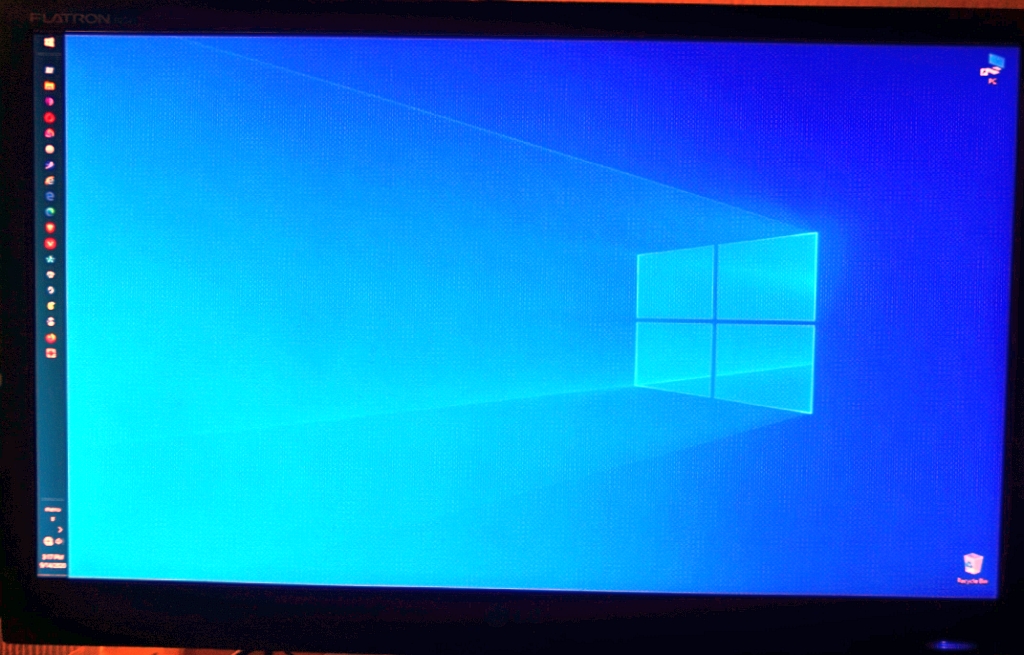
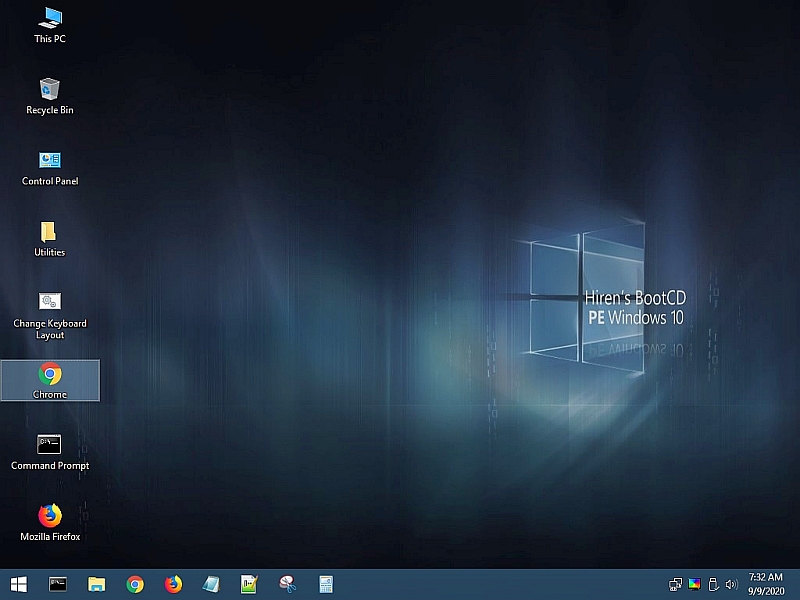
Win10PE looks just like "regular" Windows 10, kind of sort of:
<https://i.postimg.cc/HsGPFQSZ/hiren02.jpg>
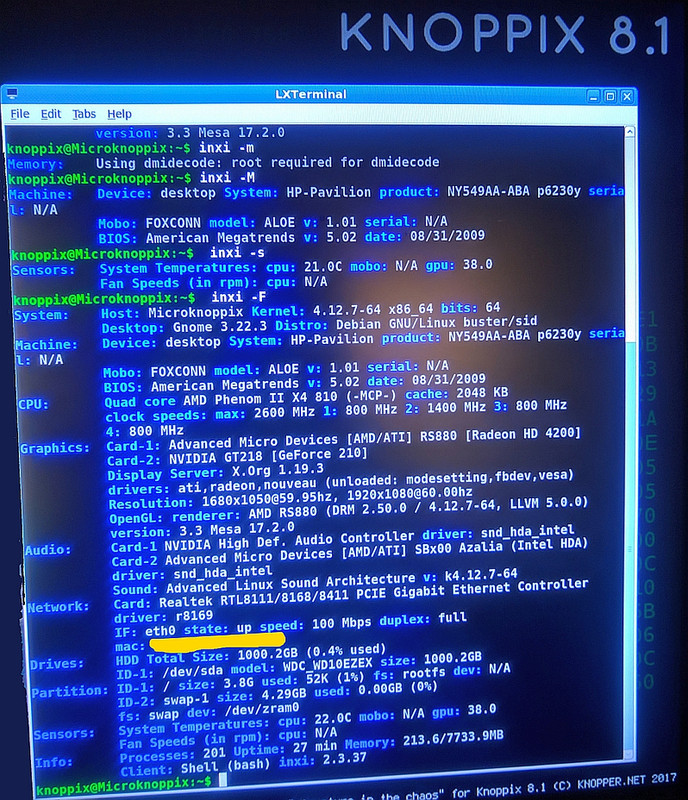
Win10PE had access to the old system also so I could save a screenshot:
<Loading Image...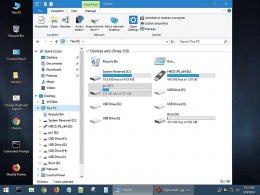 >
>
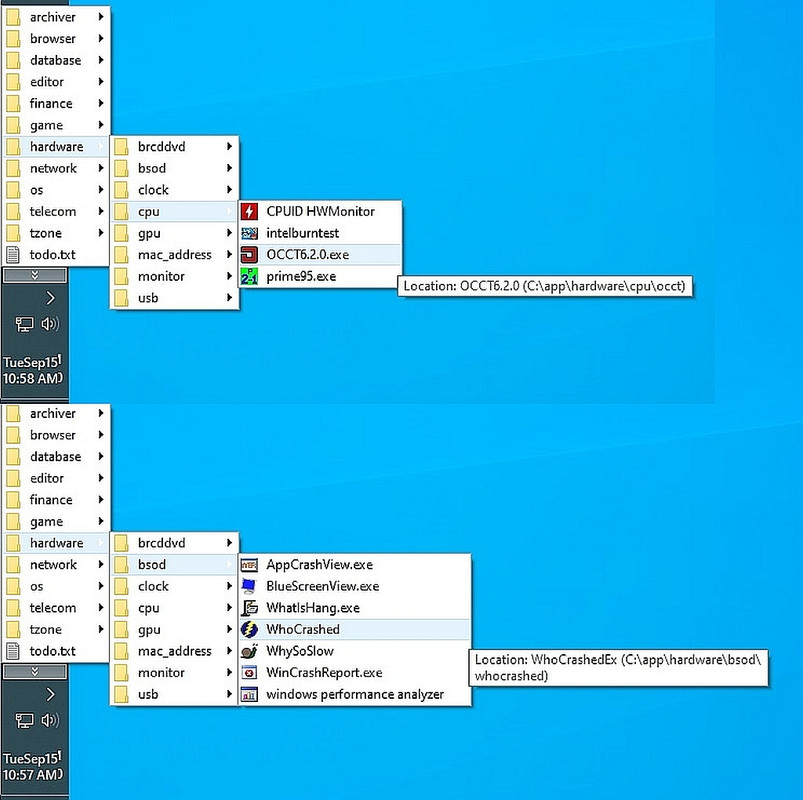
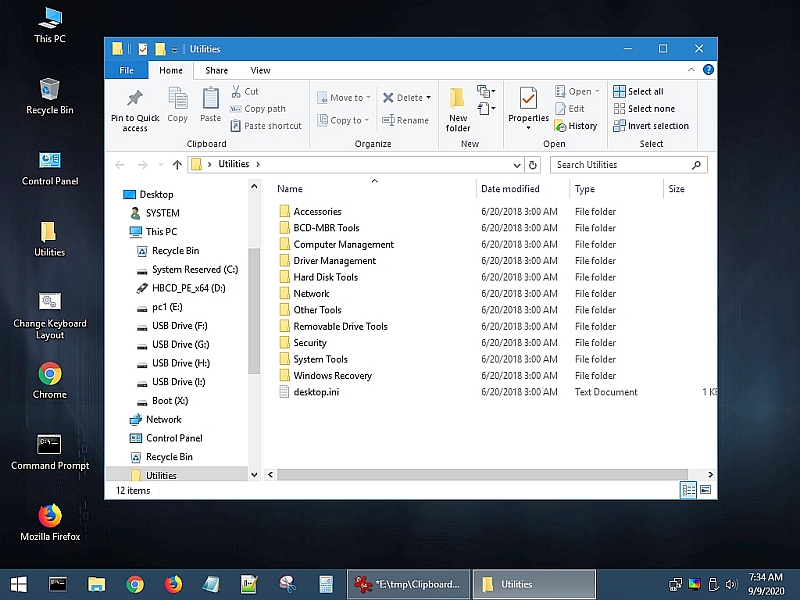
9. Each boot environment has similar (but sometimes different) debug tools:
<https://i.postimg.cc/qv5N2sWS/hiren15.jpg>
For example, on the Win10PE, these were the top level tools provided:
<Loading Image...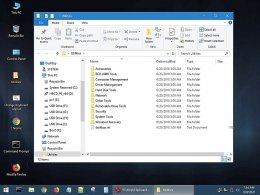 >
>
o Accessories
o BCD-MBR Tools
o Computer Management
o Driver Management
o Hard Disk Tools
o Network
o Other Tools
o Removable Drive Tools
o Security
o System Tools
o Windows Recovery
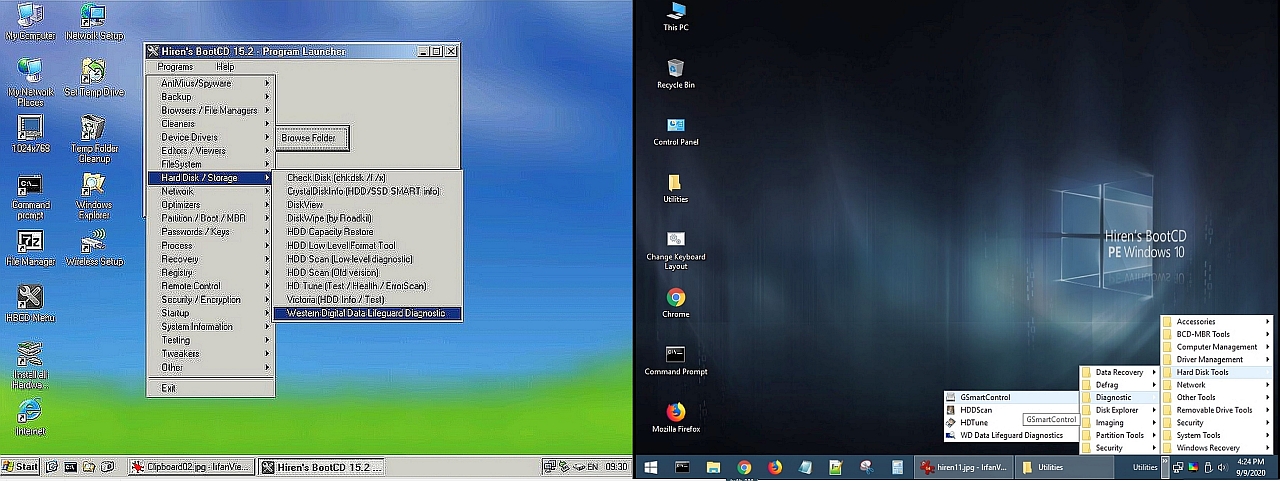
Here's what the Hiren PE had in the "Hard Disk Tools" directory:
<Loading Image...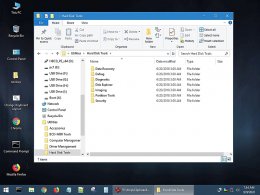 >
>
o Data Recovery
o Defrag
o Diagnostic
o Disk Explorer
o Imaging
o Partition Tools
o Security
Here's what the PE had in the Hard Disk Tools "Diagnostic" category:
<Loading Image...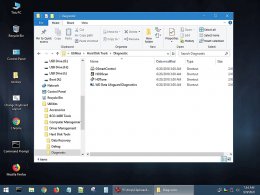 >
>
o GSmartControl
o HDDScan
o HDTune
o WD Data Lifeguard Diagnostics
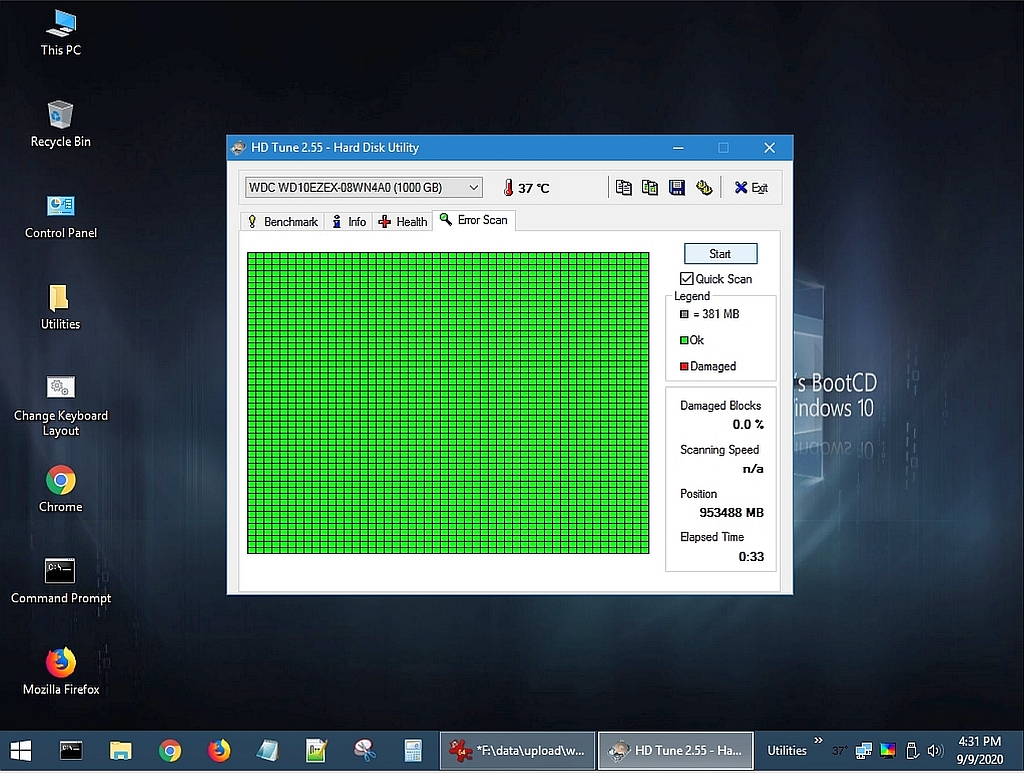
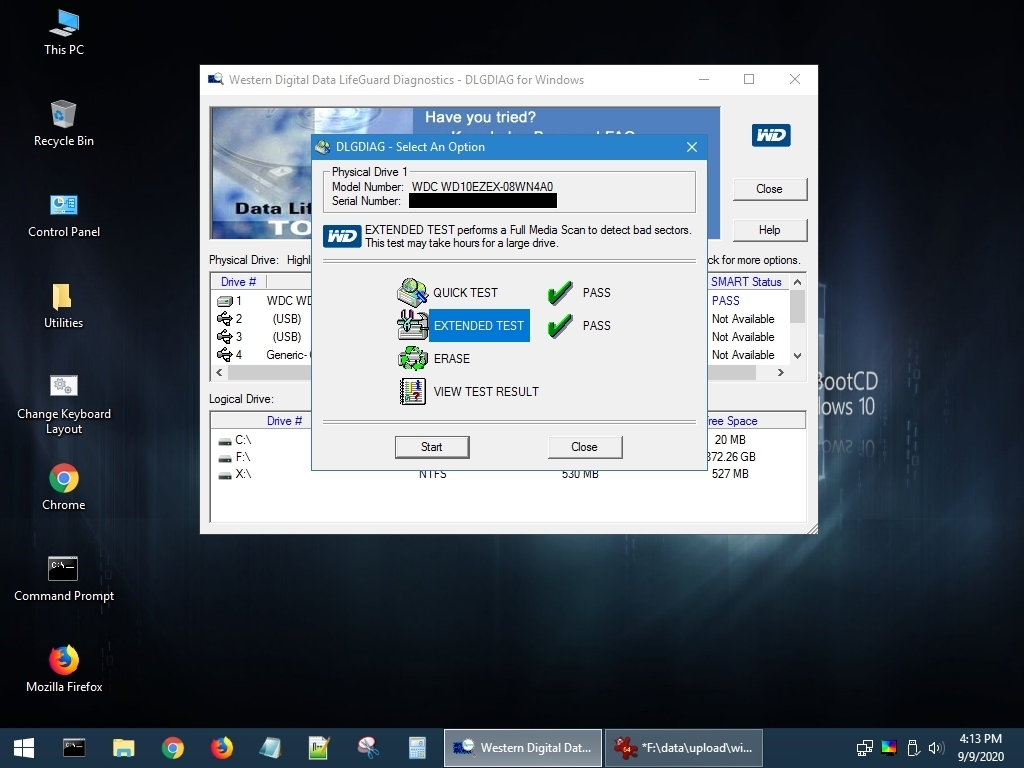
For example, here are screenshots of those HDD diagnostics on Win10PE:
<https://i.postimg.cc/CK6c7DB4/hiren06.jpg>
o GSmartControl <Loading Image... >
>
o HDTune <Loading Image... >
>
o WD Data Lifeguard Diagnostics <Loading Image... >
>
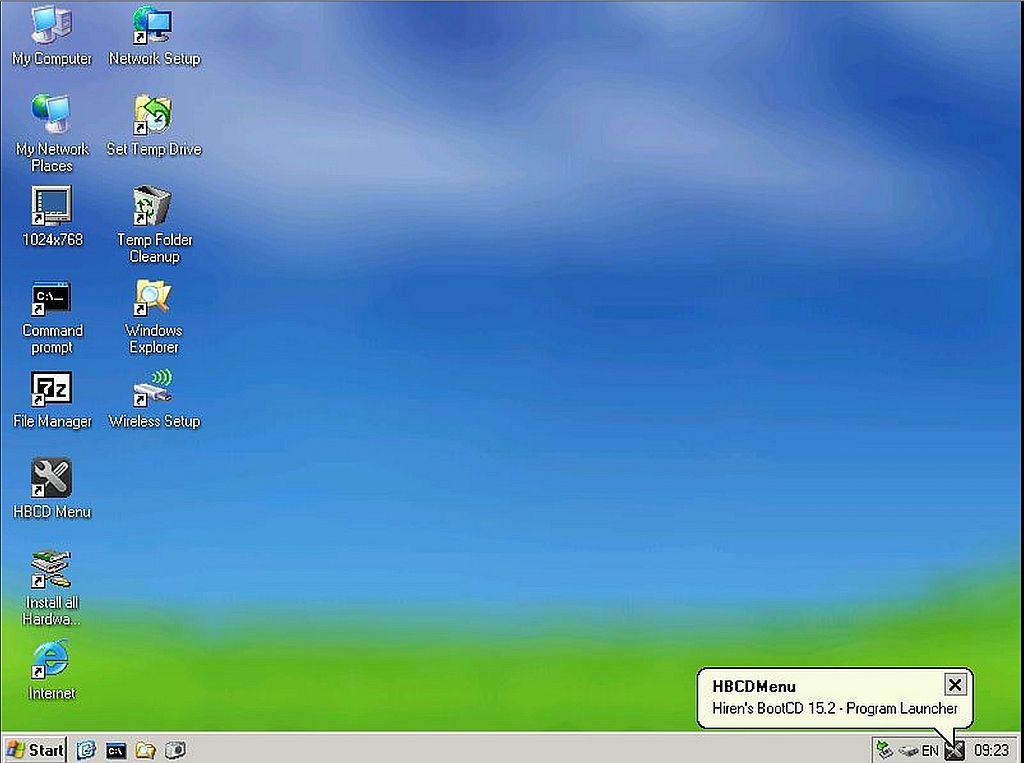
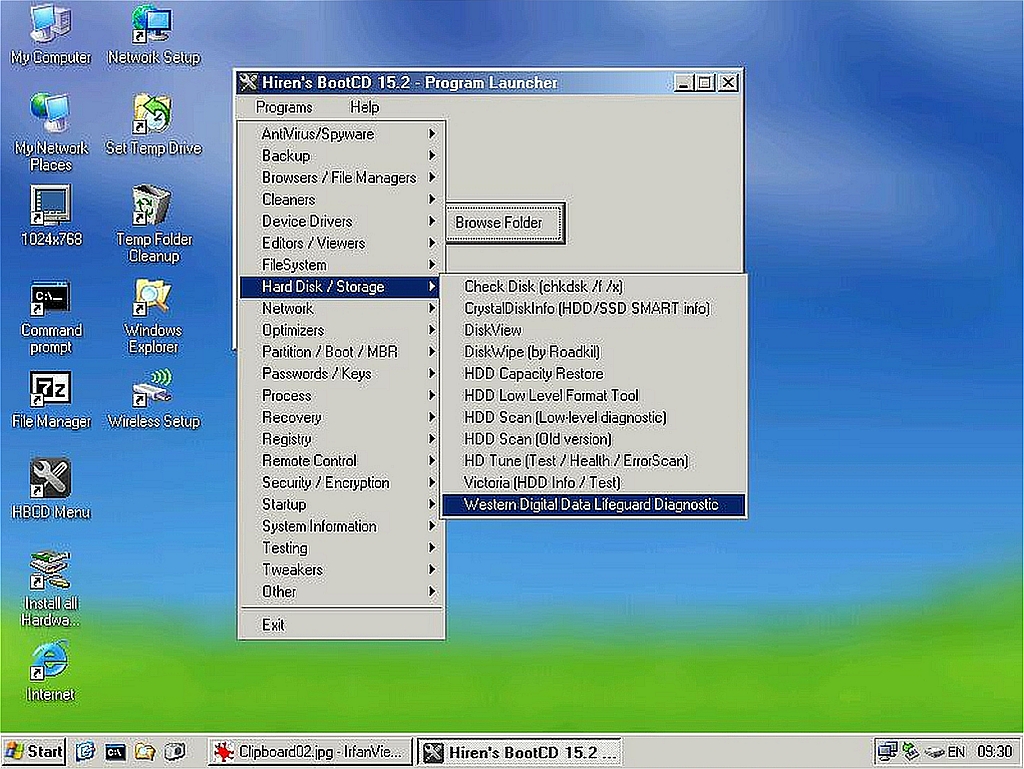
Here are HDD diagnostic utilities on WinXPmini (Hirens 15.2 Boot CD):
<Loading Image... >
>
o Check Disk (chkdsk /f /x)
o CrystalDiskInfo (HDD/SSD SMART info)
o DiskView
o DiskWIpe (by Roadkill)
o HDD Capacity Restore
o HDD Low Level Format Tool
o HDD Scan (Low-level diagnostic)
o HDD Scan (Old version)
o HDD Tune (Test / Health / ErrorScan)
o Victoria (HDD Info / Test)
o Western Digital Data Lifeguard Diagnostic
o HDDScan
o HDTune
o WD Data Lifeguard Diagnostics
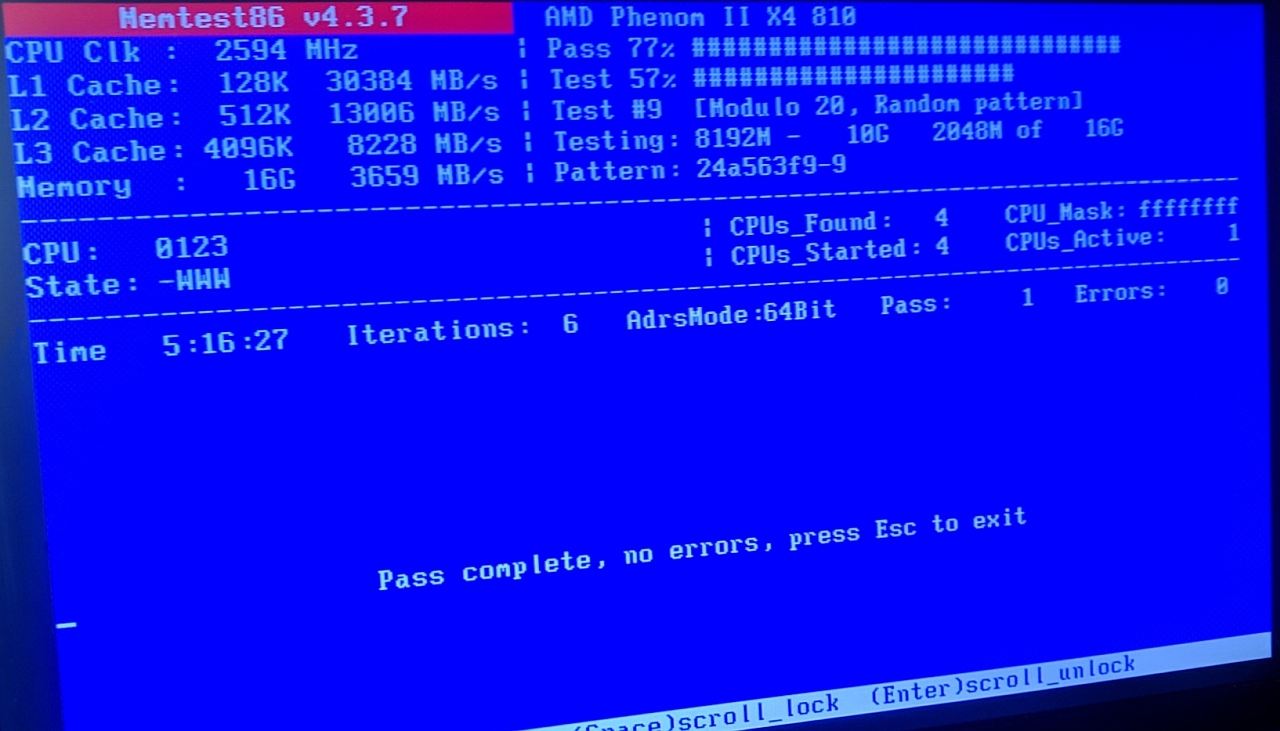
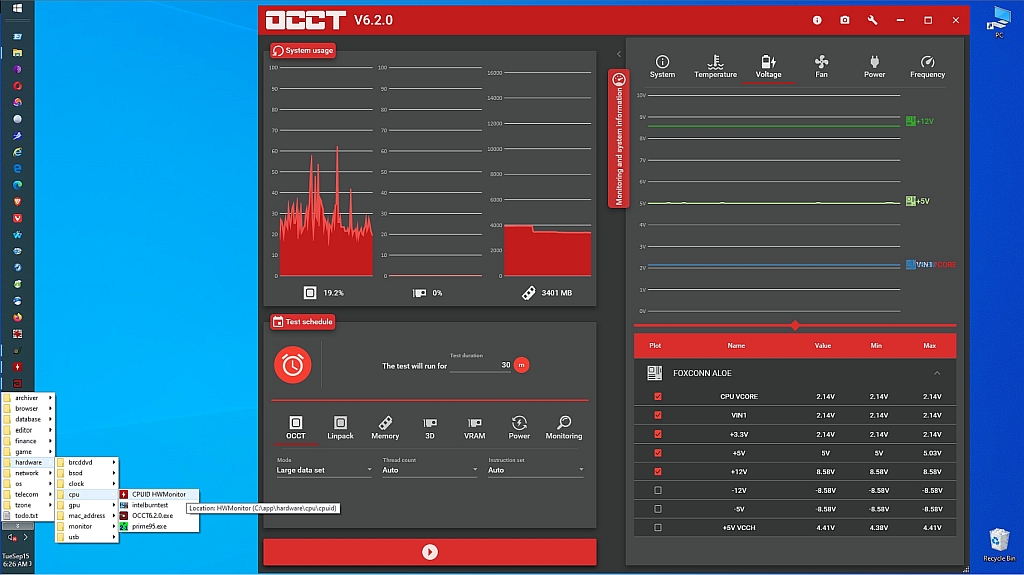
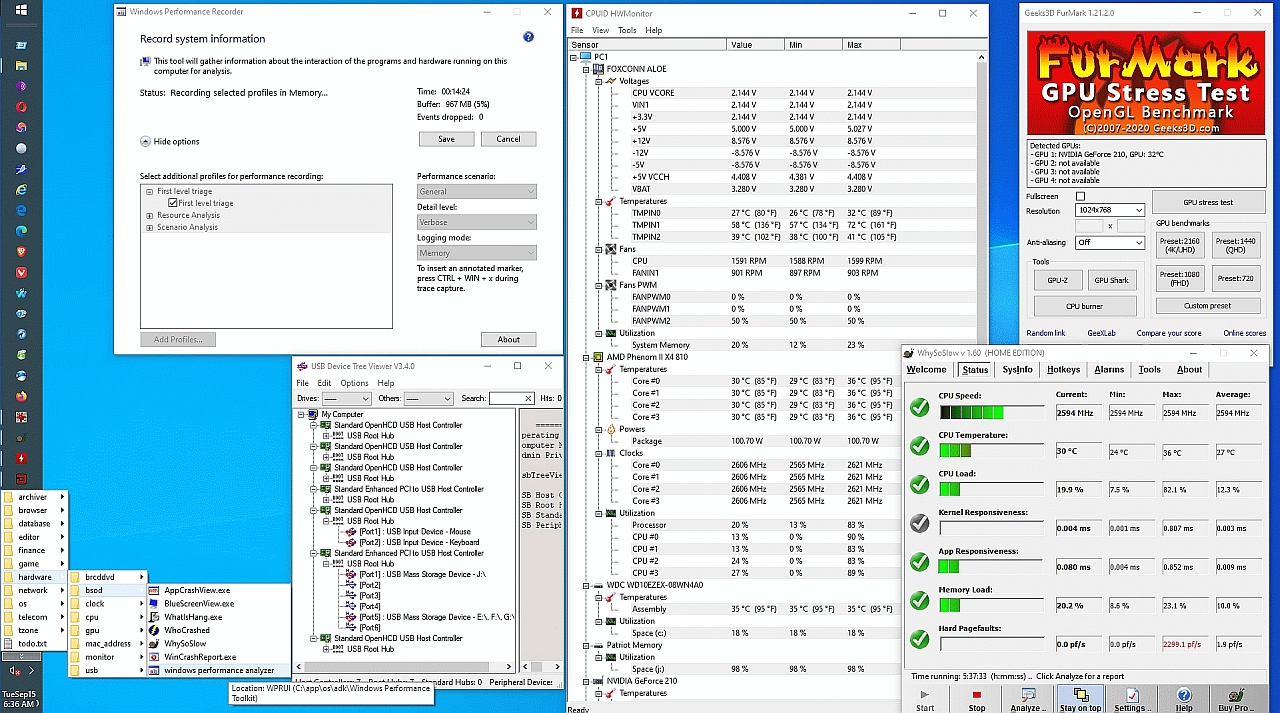
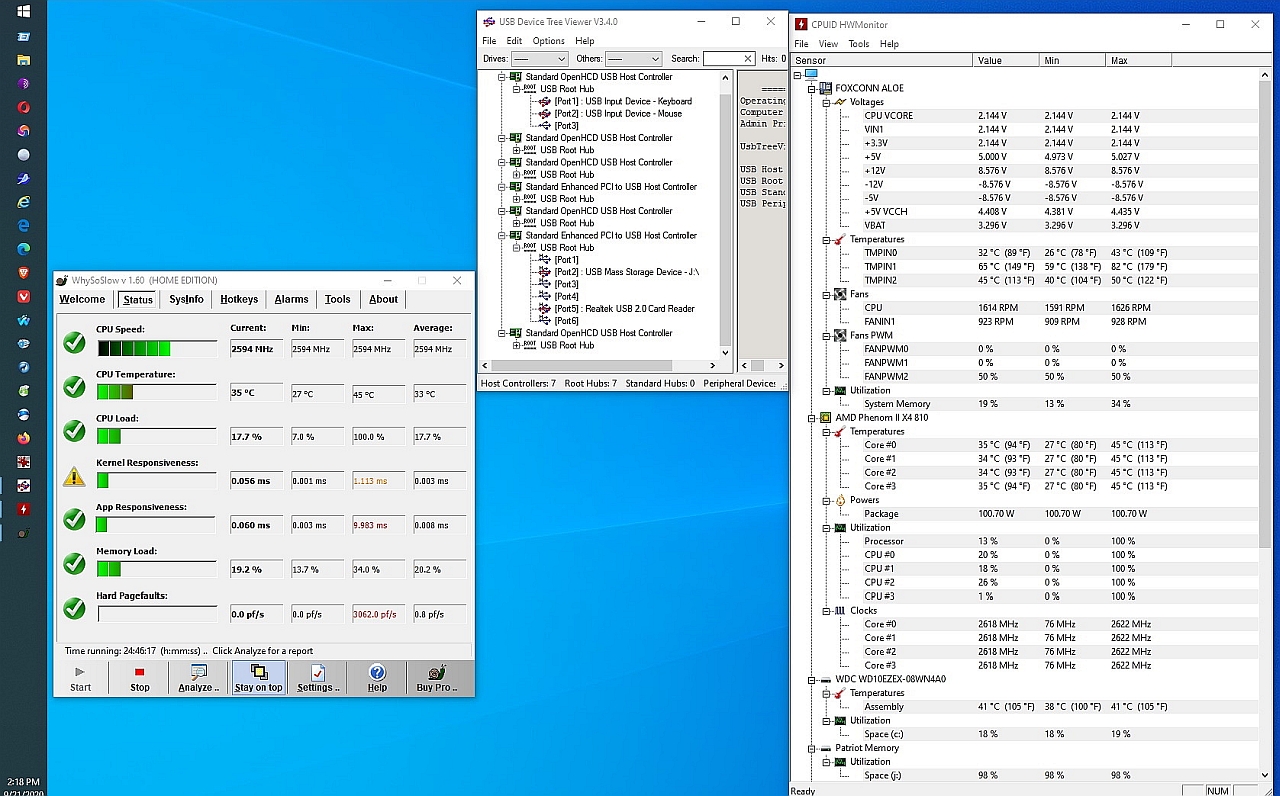
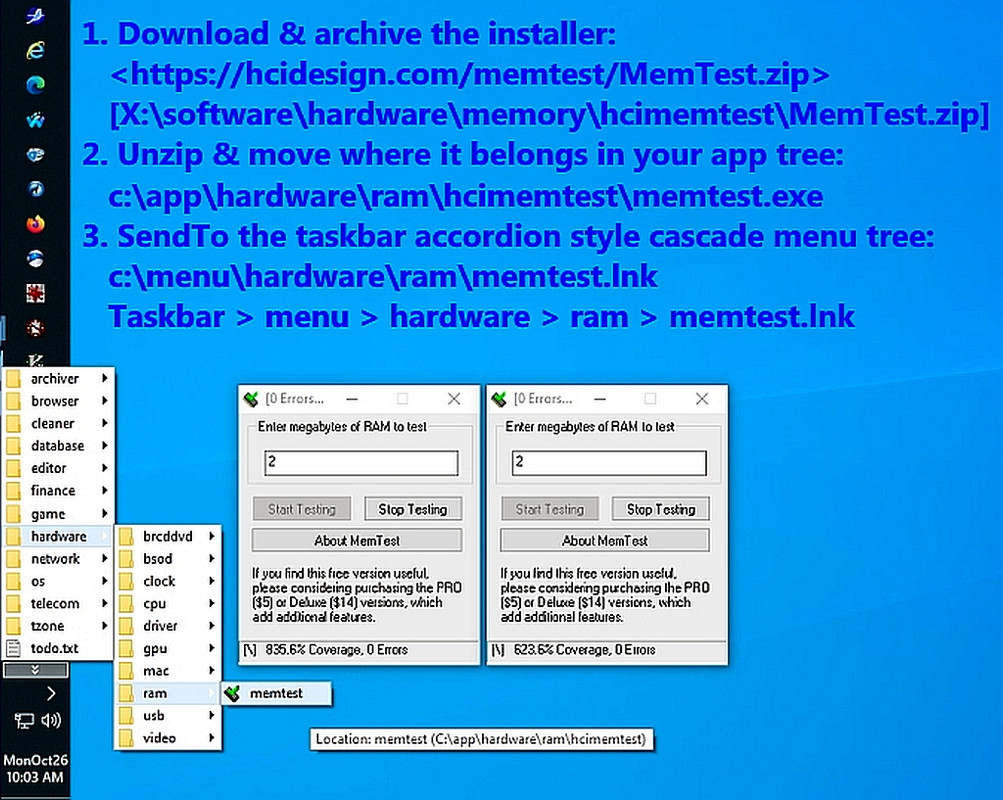
Note: While MemTest86 is on the Hirams Boot CD, you can boot it separately:
o UEFI MemTest86 v8
<https://www.memtest86.com/downloads/memtest86-usb.zip>
o BIOS MemTest86 v4
<https://www.memtest86.com/downloads/memtest86-4.3.7-usb.img.zip>
That MemTest86 utility came with an "ImageUSB.exe" utility from
"Passmark.com" <http://www.passmark.com> which seems to do pretty
much whatever Rufus 3.11 did for the Hiren's Boot CD ISO
files to create a bootable USB stick.
See also:
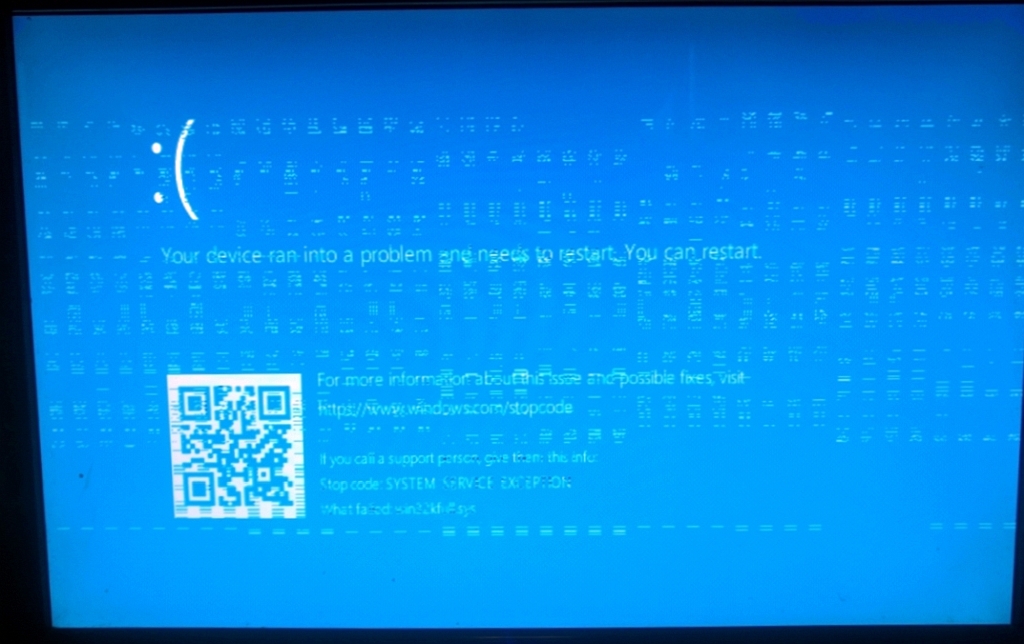
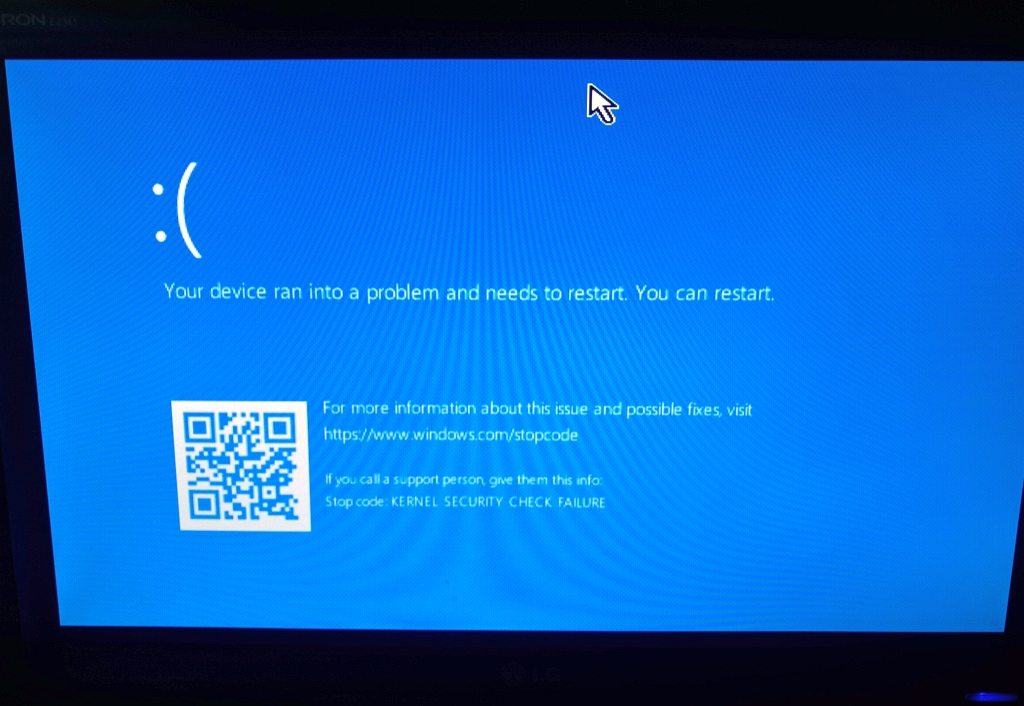
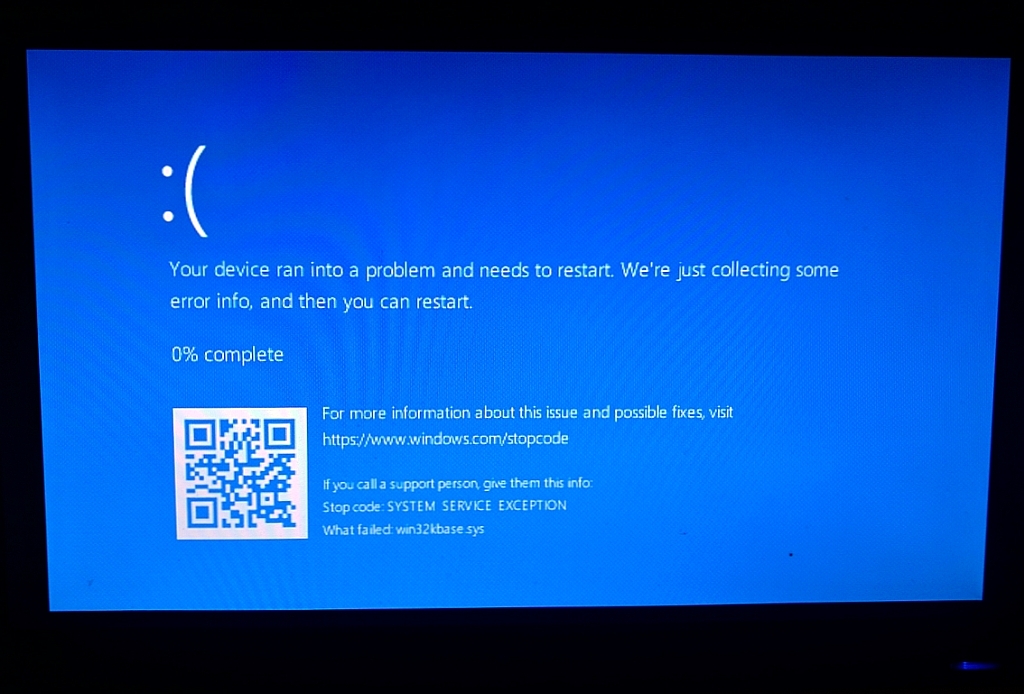
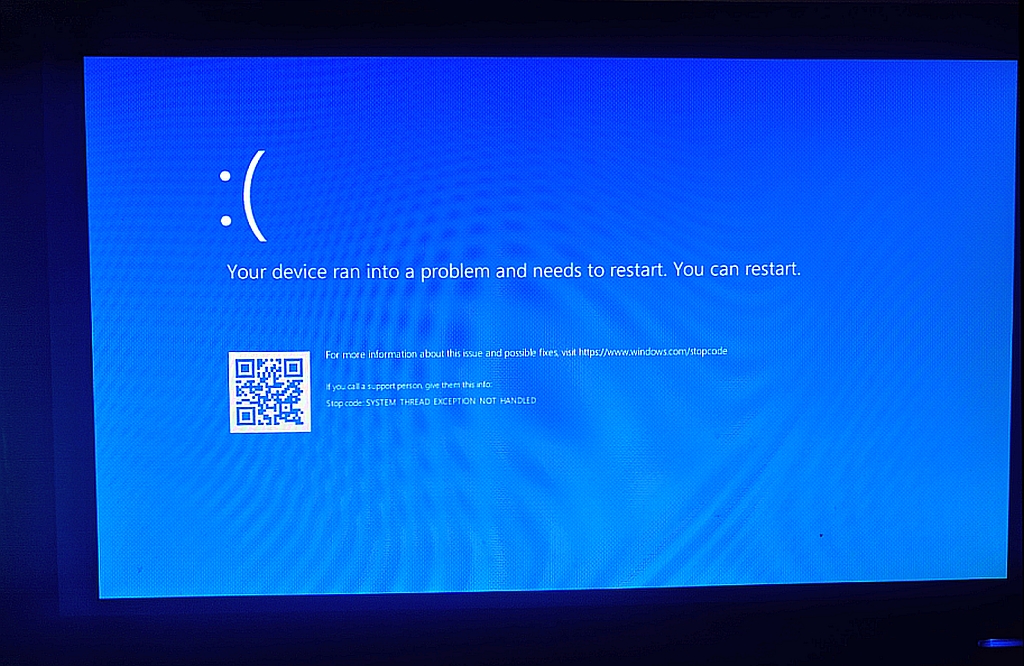
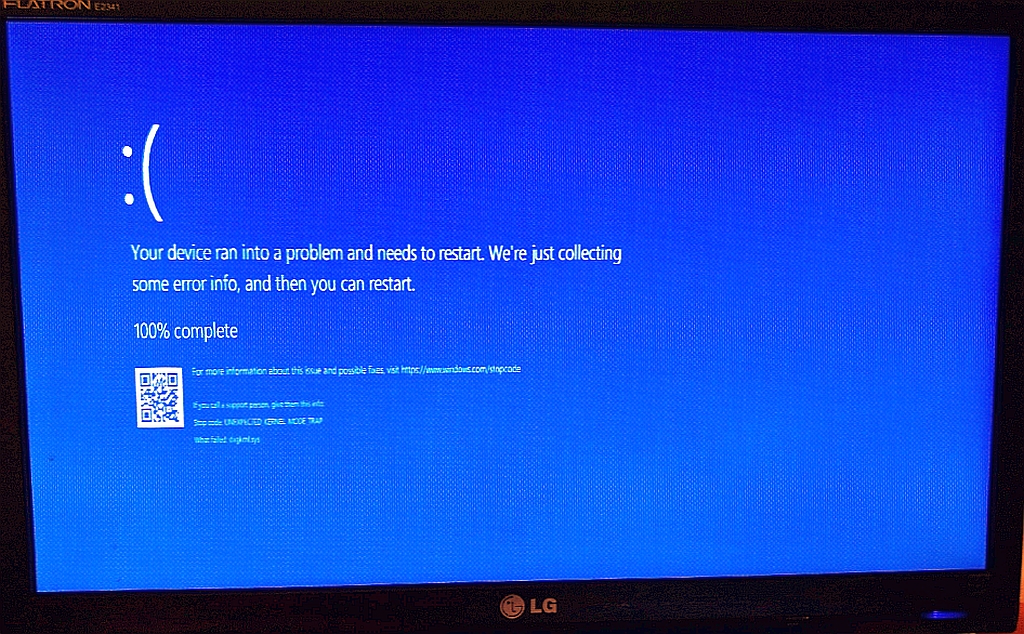
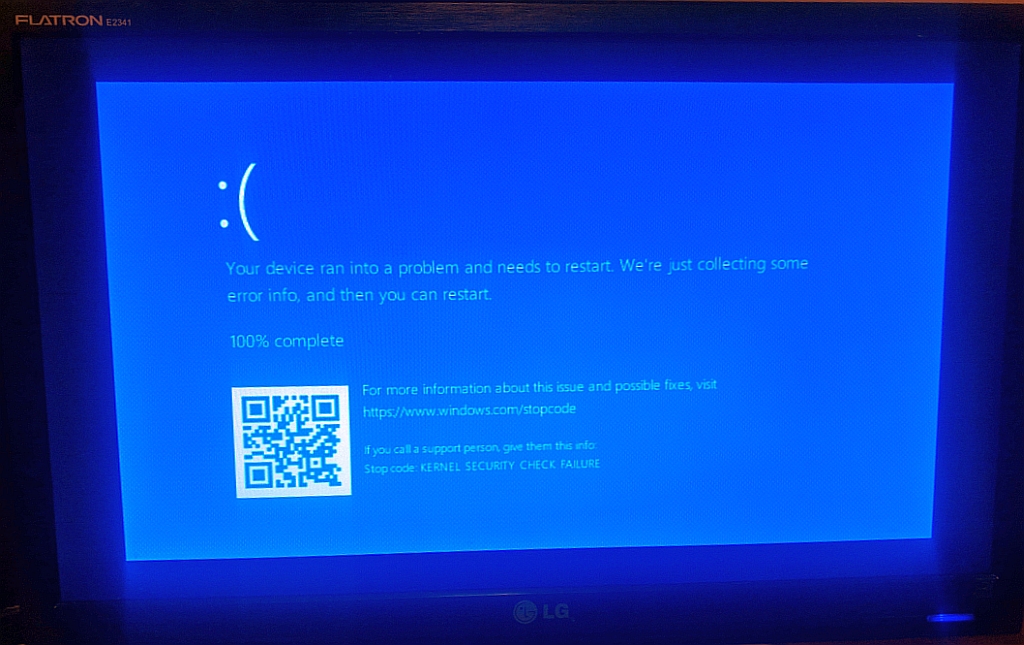
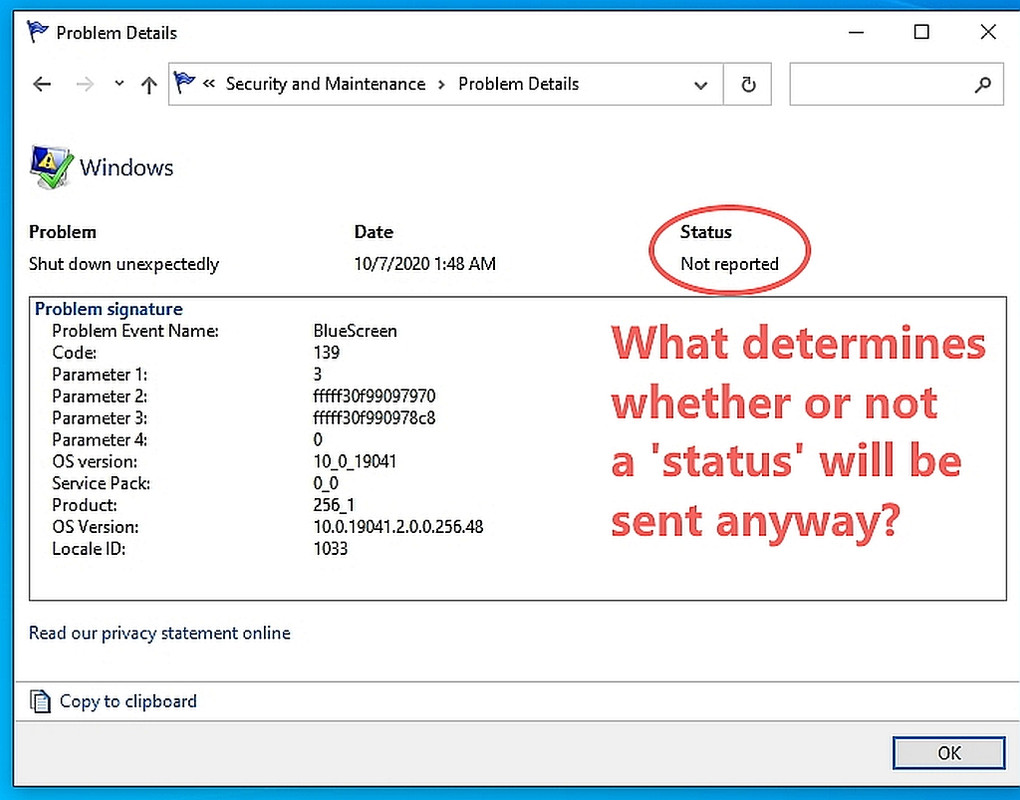
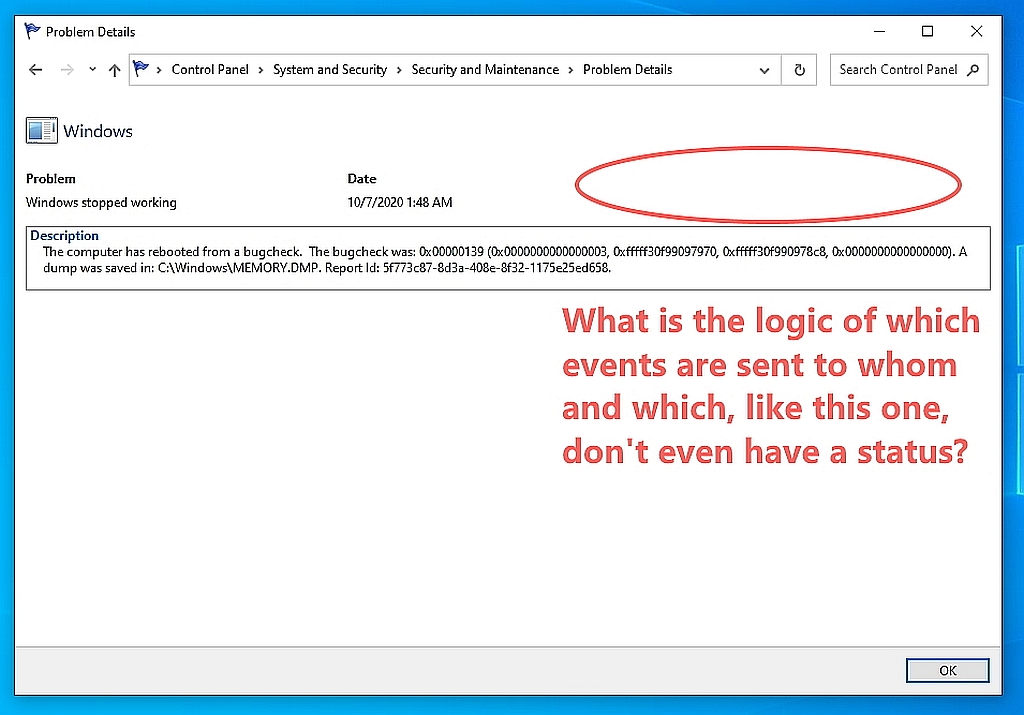
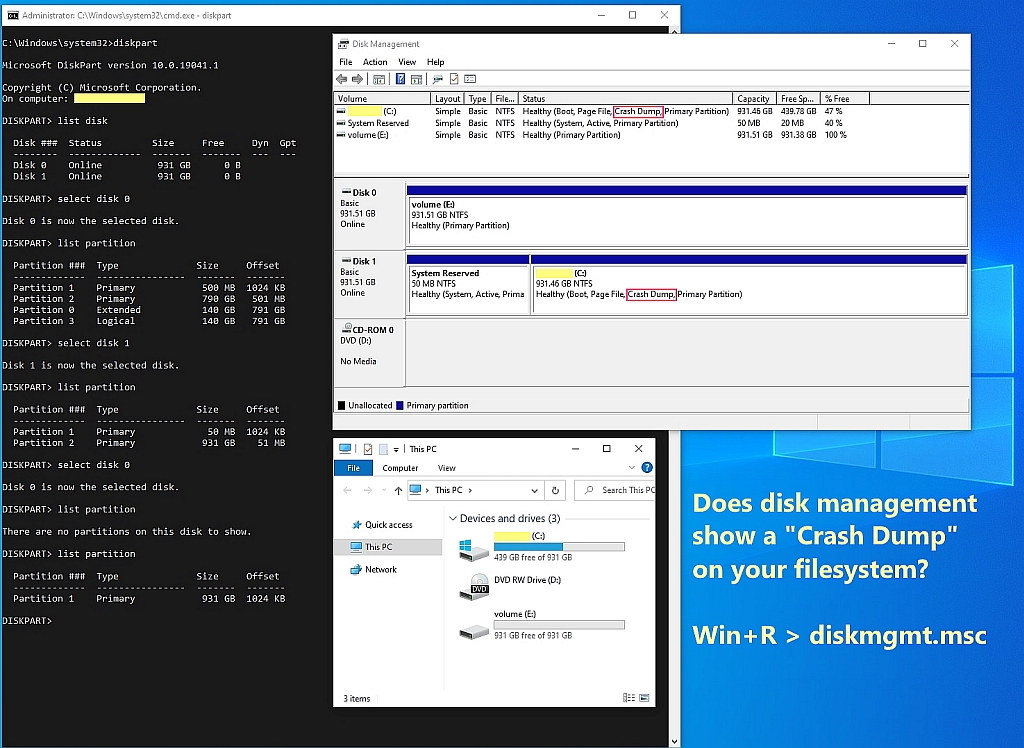
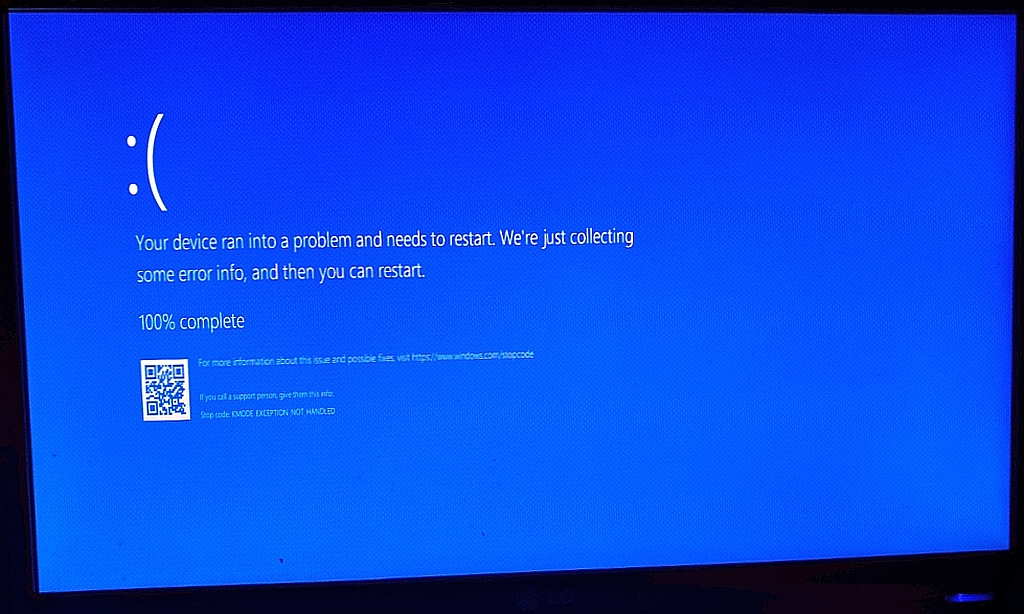
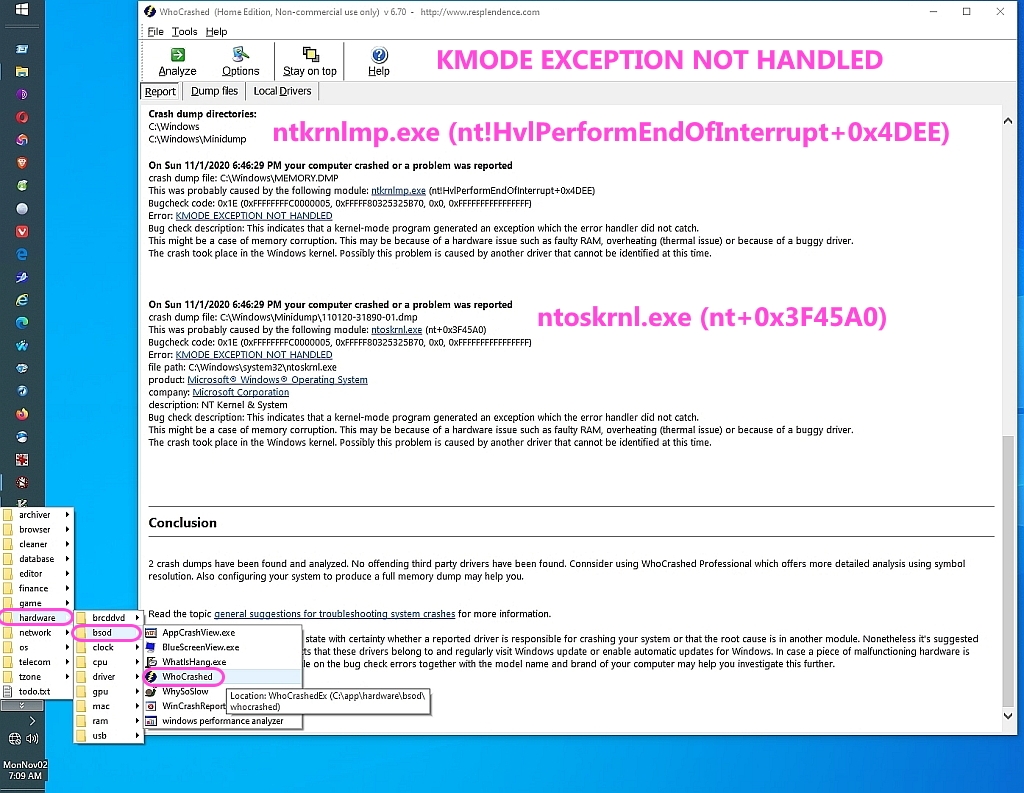
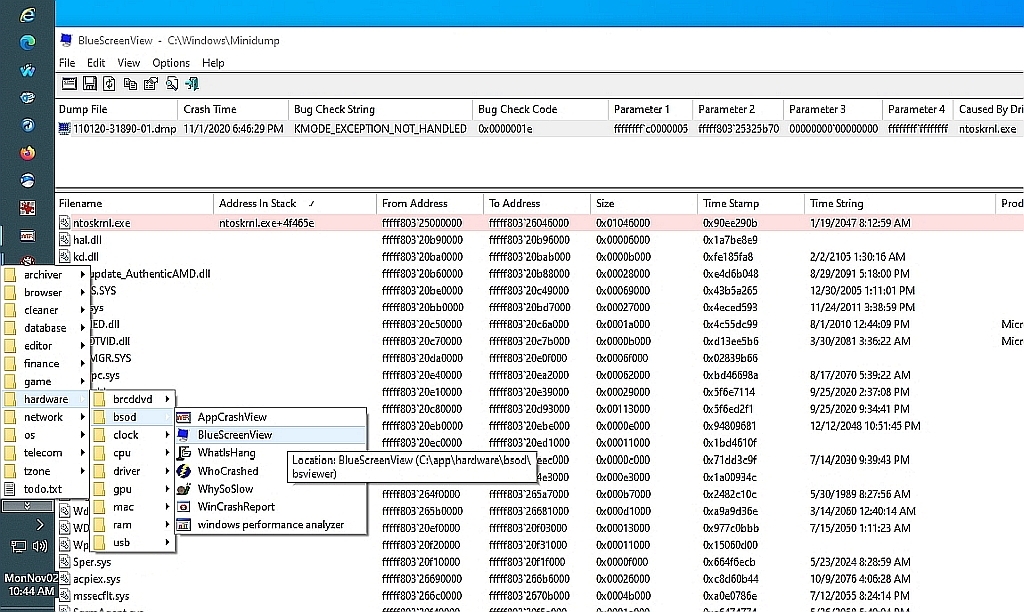
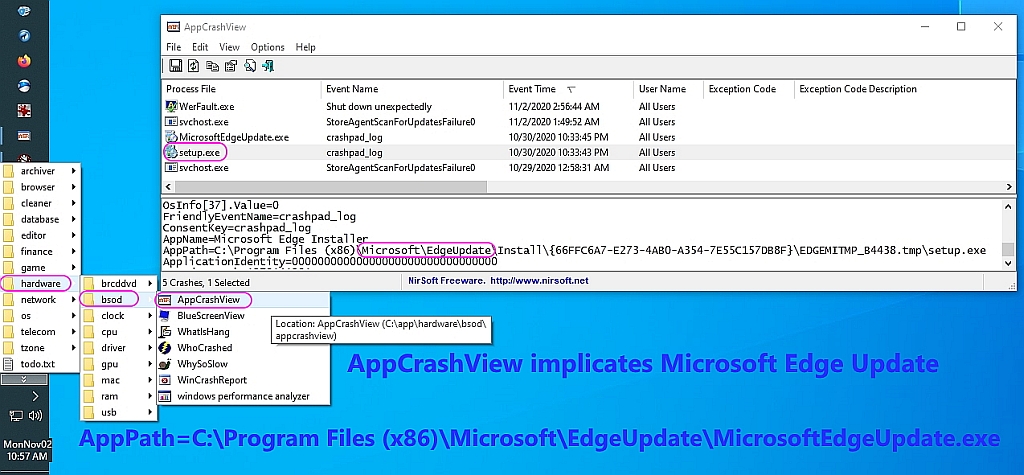
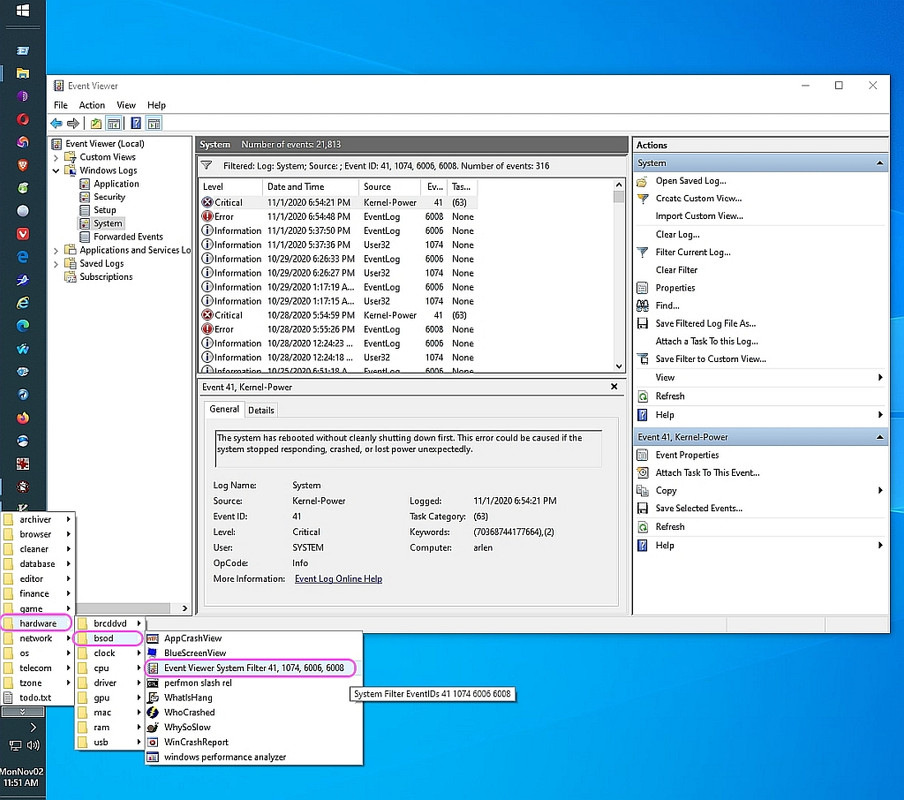
o Windows 10 BSOD indicates a hardware problem - but what hardware is the problem?
<http://www.pcbanter.net/showthread.php?t=1110105>
<https://alt.comp.os.windows-10.narkive.com/oL7PTNKu/windows-10-bsod-indicates-a-hardware-problem-but-what-hardware-is-the-problem>
testing tools for USB boot to Windows 10 PE & WinXPmini on BIOS & UEFI
(As always, please improve so that all benefit from every action you take.)
Thanks to Mike Easter for suggesting Hiram BootCD USB diagnostic tools.
o What hardware diagnostic stress-testing freeware can you recommend?
<https://groups.google.com/forum/#!topic/alt.comp.freeware/dkkdOmL95d8>
End result:
a. A 2GB USB stick can boot with BIOS/UEFI to Win10PE for diagnostics
a. A 2GB USB stick can boot with BIOS to WinXPMini for hardware diagnostics
I needed to debug hardware issues on an old 2009 desktop as described here:
o What PC hardware diagnostic stress-testing freeware can you recommend?
<https://groups.google.com/forum/#!topic/alt.comp.freeware/dkkdOmL95d8>
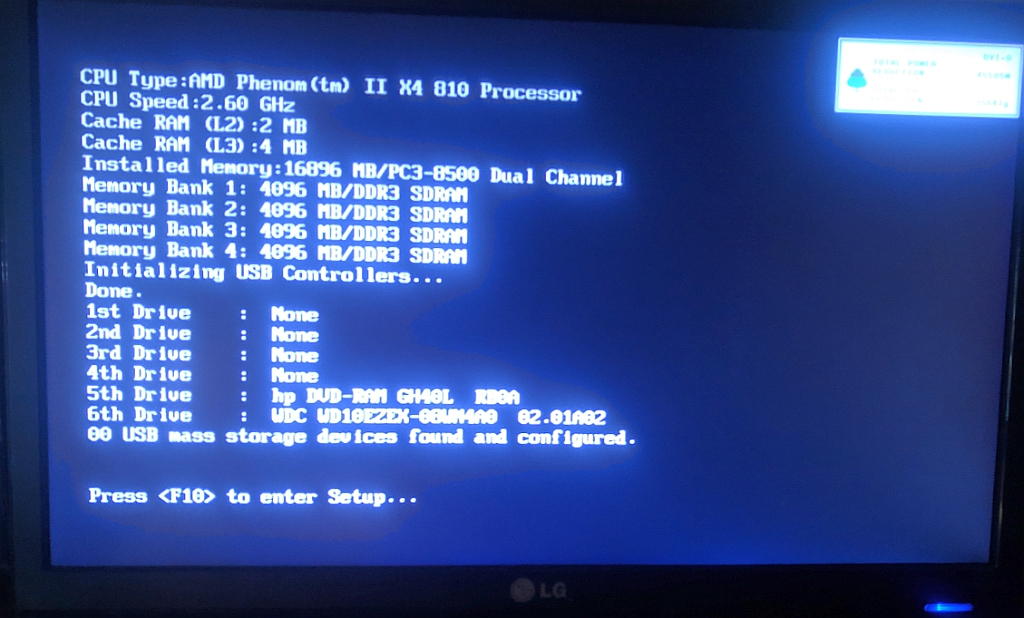
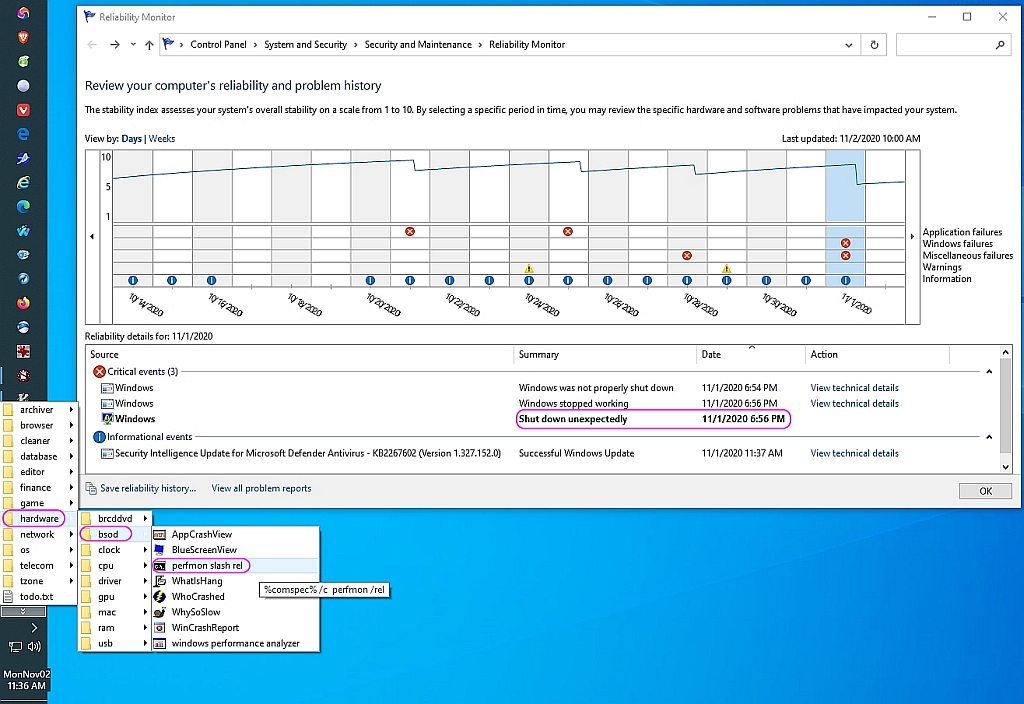
Win+R > perfmon /rel
<Loading Image...
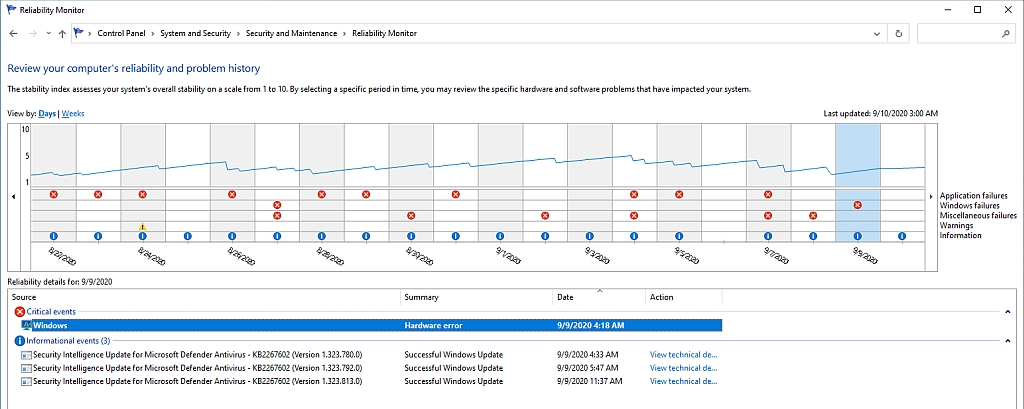 >
>This step-by-step tutorial resulted, written so that others always benefit.
(Please test & improve as this is the first pass of this nascent tutorial.)
1. Find an empty USB flash drive of at least 2GB size:
o Hirens BootCD Win10PE used about 1.25 GB of my 1.90 GB flash stick.
<Loading Image...
 >
>o Hirens BootCD 15.2 used about 0.58 GB of my 1.90 GB flash stick.
<Loading Image...
 >
>2. Determine whether your PC is BIOS or UEFI (mine is BIOS).
Win+R > %comspec% /k findstr Callback_BootEnvironmentDetect %SystemRoot%\Panther\setupact.log
o %SystemRoot%\Panther\setupact.log
- Callback_BootEnvironmentDetect: Detected boot environment: BIOS
- Callback_BootEnvironmentDetect: Detected boot environment: UEFI
Note: Mine reported BIOS
Win+R > msinfo32 > System Summary > BIOS Mode
- Win+R > msinfo32 > System Summary > BIOS Mode > Legacy
- Win+R > msinfo32 > System Summary > BIOS Mode > UEFI
Note: Legacy === BIOS
3. If needed, set your PC boot order so that it boots from the USB stick.
For me the defaults worked: i.e., at POST, F10==BIOS, ESC=BOOT, F9=DIAG
Entering Setup > Boot > Boot Device Priority
1st Boot Device = [CD-ROM Group]
2nd Boot Device = [Floppy Group]
3rd Boot Device = [HDD Group]
4th Boot Device = [Network Boot Group]
Note: USB isn't mentioned in my BIOS; but USB booted fine nonetheless.
4. Download the Hiren's Boot CD software containing diagnostic tools:
<http://www.hirensbootcd.org/download/>
a. UEFI/BIOS Win10PE:
Download either the Win10PE BIOS/UEFI HirensBootCD (HBCD) ISO file:
<https://www.hirensbootcd.org/files/HBCD_PE_x64.iso>
<https://www.hirensbootcd.org/files/HBCD_PE_x64.iso>
<http://mirror.sfo12.us.leaseweb.net/hirensbootcd/HBCD_PE_x64.iso>
Name: HBCD_PE_x64.iso
Size: 1354811392 bytes (1292 MiB)
SHA256: D67BCF0437A1BD27F31655C4A9C81C93269A5A239D43F38D0375618443D372BC
b. BIOS WinXPmini:
Or download the BIOS-only WinXPmini HirensBootCD (HBCD) ISO file:
<http://www.hirensbootcd.org/files/Hirens.BootCD.15.2.zip>
Name: Hiren's.BootCD.15.2.iso
Size: 603979776 bytes (576 MiB)
SHA256: 50384A61D304E06B720F9EF729C662D2E9EDA05A96E1C9056975C40E3BF3F2D0
Note: The tools on these two releases are both the same & different:
<Loading Image...
 >
>5. Download the Windows Rufus ISO-to-USB tool:
<https://rufus.ie/>
<https://github.com/pbatard/rufus/releases/download/v3.11/rufus-3.11.exe>
Name: rufus-3.11.exe
Size: 1155640 bytes (1128 KiB)
SHA256: A43BF34285D393F843B05D80F74C4790ED7F6AC636393CA5F6375AE0BB02E719
6. Remove all USB drives & insert the empty USB flash drive into the PC.
7. In Windows, right click on the Rufus executable to run as administrator.
NOTE: The specific settings for creating a BIOS Win10PE USB are not
documented anywhere on the net I could find, so please take note:
<Loading Image...
 >
>a. UEFI Win10PE
To create a bootable USB stick for HBCD_PE_x64.iso on UEFI machines:
When you start Rufus as an admin, accept the Win10 UAC consent prompt.
This brings up the Rufus 3.11.1678 GUI
Set the options to:
- Device: (choose your empty USB stick drive letter and label)
(If you only have one USB stick plugged in, it will default to it.)
- Boot selection:
(Choices are: "Disk or ISO image", "FreeDOS", "Non bootable")
I left the Boot selection at "Disk or ISO image".
I pressed the [SELECT] button to choose the "HBCD_PE_x64.iso" file.
- Partition scheme: GPT (The only options are "GPT" and "MBR")
Target System: The only option is "UEFI (non CSM)"
Volume label: This defaulted to "HBCD_PE_x64"
File system: FAT32 (other choices are "NTFS" & "FAT")
Cluster size: It defaulted to 4096 bytes (but other options existed).
When the Status says "READY", press the "START" button.
A warning pops up saying all data on the USB drive will be destroyed.
Press [OK].
The messages will be:
- Deleting partitions (This may take a while)...
- Partitioning (GPT)...
- Formatting (FAT32)...
- Creating file system: Task 1/5 completed.
- Creating file system: Task 2/5 completed.
- Creating file system: Task 3/5 completed.
- Creating file system: Task 4/5 completed.
- Creating file system: Task 5/5 completed.
- Writing Master Boot Record
- Copying ISO files:
- Success
(Mine took six minutes to complete from start to finish.)
Note: You'll get this error if you create a UEFI USB but boot on BIOS:
<https://i.postimg.cc/2ykDXjW6/hiren01.jpg>
ERROR: BIOS/LEGACY BOOT OF UEFI-ONLY MEDIA
Recreate the drive in RUFUS and use:
* Partition scheme -> MBR
* Target system -> BIOS
b. BIOS Win10PE
To create a bootable USB stick for HBCD_PE_x64.iso on BIOS machines:
* Partition scheme -> MBR
* Target system -> BIOS (it was the only option once MBR was set)
* File system -> NTFS (it was the only option once MBR was set)
(Mine took five minutes to complete from start to finish.)
c. BIOS WinXPmini
To create a bootable USB stick for HBCD 15.2 on BIOS machines:
Boot selection -> Hiren's.BootCD.15.2.iso
Partition scheme -> "MBR" (it's the only option)
Target system -> "BIOS (or UEFI-CSM)" (it's the only option)
Volume label -> HBCD 15.2 (it's the default)
File system -> "FAT32" (other options are "FAT" & "NTFS")
Cluster size -> "4096 bytes (Default)"
[START] (Mine took 30 minutes to complete from start to finish.)
8. Now you can boot using that USB image on BIOS/UEFI for Win10/WinXP!
Note: In my case, I press "ESC" during POST to get to the boot menu.
Win10PE: <https://i.postimg.cc/HsGPFQSZ/hiren02.jpg>
WinXPMini: <https://i.postimg.cc/50BSJCK9/hiren07.jpg>
Note: My boot to Windows10PE was _much_ faster than to WinXPmini.
Win10PE looks just like "regular" Windows 10, kind of sort of:
<https://i.postimg.cc/HsGPFQSZ/hiren02.jpg>
Win10PE had access to the old system also so I could save a screenshot:
<Loading Image...
 >
>9. Each boot environment has similar (but sometimes different) debug tools:
<https://i.postimg.cc/qv5N2sWS/hiren15.jpg>
For example, on the Win10PE, these were the top level tools provided:
<Loading Image...
 >
>o Accessories
o BCD-MBR Tools
o Computer Management
o Driver Management
o Hard Disk Tools
o Network
o Other Tools
o Removable Drive Tools
o Security
o System Tools
o Windows Recovery
Here's what the Hiren PE had in the "Hard Disk Tools" directory:
<Loading Image...
 >
>o Data Recovery
o Defrag
o Diagnostic
o Disk Explorer
o Imaging
o Partition Tools
o Security
Here's what the PE had in the Hard Disk Tools "Diagnostic" category:
<Loading Image...
 >
>o GSmartControl
o HDDScan
o HDTune
o WD Data Lifeguard Diagnostics
For example, here are screenshots of those HDD diagnostics on Win10PE:
<https://i.postimg.cc/CK6c7DB4/hiren06.jpg>
o GSmartControl <Loading Image...
 >
>o HDTune <Loading Image...
 >
>o WD Data Lifeguard Diagnostics <Loading Image...
 >
>Here are HDD diagnostic utilities on WinXPmini (Hirens 15.2 Boot CD):
<Loading Image...
 >
>o Check Disk (chkdsk /f /x)
o CrystalDiskInfo (HDD/SSD SMART info)
o DiskView
o DiskWIpe (by Roadkill)
o HDD Capacity Restore
o HDD Low Level Format Tool
o HDD Scan (Low-level diagnostic)
o HDD Scan (Old version)
o HDD Tune (Test / Health / ErrorScan)
o Victoria (HDD Info / Test)
o Western Digital Data Lifeguard Diagnostic
o HDDScan
o HDTune
o WD Data Lifeguard Diagnostics
Note: While MemTest86 is on the Hirams Boot CD, you can boot it separately:
o UEFI MemTest86 v8
<https://www.memtest86.com/downloads/memtest86-usb.zip>
o BIOS MemTest86 v4
<https://www.memtest86.com/downloads/memtest86-4.3.7-usb.img.zip>
That MemTest86 utility came with an "ImageUSB.exe" utility from
"Passmark.com" <http://www.passmark.com> which seems to do pretty
much whatever Rufus 3.11 did for the Hiren's Boot CD ISO
files to create a bootable USB stick.
See also:
o Windows 10 BSOD indicates a hardware problem - but what hardware is the problem?
<http://www.pcbanter.net/showthread.php?t=1110105>
<https://alt.comp.os.windows-10.narkive.com/oL7PTNKu/windows-10-bsod-indicates-a-hardware-problem-but-what-hardware-is-the-problem>
--
As always, please test & improve so all may benefit from your every action.
As always, please test & improve so all may benefit from your every action.